<?xml version="1.0" encoding="utf-8"?>
<feed xmlns="http://www.w3.org/2005/Atom">

  <title><![CDATA[Sean's Obsessions]]></title>
  <link href="https://ertw.com/blog/atom.xml" rel="self"/>
  <link href="https://ertw.com/blog/"/>
  <updated>2019-03-10T09:31:46-04:00</updated>
  <id>https://ertw.com/blog/</id>
  <author>
    <name><![CDATA[Sean Walberg]]></name>
    
  </author>
  <generator uri="http://octopress.org/">Octopress</generator>

  
  <entry>
    <title type="html"><![CDATA[Managing Secrets in Chef With Hashicorp Vault]]></title>
    <link href="https://ertw.com/blog/2016/11/08/managing-secrets-in-chef-with-hashicorp-vault/"/>
    <updated>2016-11-08T09:51:49-05:00</updated>
    <id>https://ertw.com/blog/2016/11/08/managing-secrets-in-chef-with-hashicorp-vault</id>
    <content type="html"><![CDATA[<h2>The Problem</h2>

<p>It&rsquo;s pretty common to need Chef to be able to store secrets such as database passwords or API keys. The easiest thing to do is to store them in a <a href="https://docs.chef.io/data_bags.html">data bag</a>, but that&rsquo;s open for the world to see. Encrypted data bags are nice but key management is a gigantic pain. A better solution is <a href="https://github.com/chef-cookbooks/chef-vault">Chef Vault</a>, which encrypts the data bag&rsquo;s secret once for each client (a client being a Chef node or administrative user)</p>

<p>At the same time your organization likely has a need to keep secret data for applications, too. One could store these secrets in the same place as the Chef secrets but if you don&rsquo;t like having Chef manage application configuration files then you&rsquo;re out of luck. <a href="https://www.vaultproject.io/">HashiCorp Vault</a> is one solution here that we&rsquo;ve used successfully.</p>

<p>With HashiCorp Vault, each client (or groups of clients) has a token that gives them access to certain secrets, dictated by a policy. So you can say that a certain token can only read user accounts and give that to your application or Chef. But how do you keep that token a secret?</p>

<p>I&rsquo;ll also add that the management of HashiCorp Vault is nicer than that of Chef-Vault. That is, making changes to the secrets is a bit nicer because there&rsquo;s a well defined API that directly manipulates the secrets, rather than having to use the Chef-Vault layer of getting the private key for the encrypted data bag and making changes to JSON. Furthermore this lets us store some of our secrets in the same place that applications are looking, which can be beneficial.</p>

<p>In this example, I have a Chef recipe with a <a href="https://docs.chef.io/custom_resources.html">custom resource</a> to create users in a proprietary application. I want to store the user information in HashiCorp vault because the management of the users will be easier for the operations team, and it will also allow other applications to access the same secrets. The basic premise here is that the data will go in HashiCorp Vault and the token to access the HashiCorp Vault will be stored in Chef&rsquo;s Vault.</p>

<h2>The Code</h2>

<p>The first thing to do is set up your secrets in HashiCorp Vault. We&rsquo;ll want to create a policy that only allows read access in to the part of the Vault that Chef will read from. Add this to <code>myapp.hcl</code></p>

<figure class='code'><div class="highlight"><table><tr><td class="gutter"><pre class="line-numbers"><span class='line-number'>1</span>
<span class='line-number'>2</span>
<span class='line-number'>3</span>
</pre></td><td class='code'><pre><code class=''><span class='line'>path "secret/myapp/*" {
</span><span class='line'>  policy = "read"
</span><span class='line'>}</span></code></pre></td></tr></table></div></figure>


<p>Create the policy:</p>

<figure class='code'><div class="highlight"><table><tr><td class="gutter"><pre class="line-numbers"><span class='line-number'>1</span>
<span class='line-number'>2</span>
</pre></td><td class='code'><pre><code class=''><span class='line'>[root@vault ~]# vault policy-write myapp myapp.hcl
</span><span class='line'>Policy 'myapp' written.</span></code></pre></td></tr></table></div></figure>


<p>Create a token that uses that policy. Note that the token must be renewable, as we&rsquo;re going to have Chef renew it each time. Otherwise it&rsquo;ll stop working after a month.</p>

<figure class='code'><div class="highlight"><table><tr><td class="gutter"><pre class="line-numbers"><span class='line-number'>1</span>
<span class='line-number'>2</span>
<span class='line-number'>3</span>
<span class='line-number'>4</span>
<span class='line-number'>5</span>
<span class='line-number'>6</span>
<span class='line-number'>7</span>
<span class='line-number'>8</span>
</pre></td><td class='code'><pre><code class=''><span class='line'>[root@vault ~]# vault token-create -policy=myapp -renewable=true
</span><span class='line'>Key               Value
</span><span class='line'>---               -----
</span><span class='line'>token             ba85411e-ab76-0c0f-c0b8-e26ce294ae0d
</span><span class='line'>token_accessor
</span><span class='line'>token_duration    720h0m0s
</span><span class='line'>token_renewable   true
</span><span class='line'>token_policies    [myapp]
</span></code></pre></td></tr></table></div></figure>


<p>That value beginning with <code>ba85</code> is the token that Chef will use to talk to the Vault. With your root token you can add your first secret:</p>

<figure class='code'><div class="highlight"><table><tr><td class="gutter"><pre class="line-numbers"><span class='line-number'>1</span>
</pre></td><td class='code'><pre><code class=''><span class='line'>vault write secret/myapp/testuser password=abc123 path=/tmp</span></code></pre></td></tr></table></div></figure>


<p>At this point we have a user in the HashiCorp Vault and a token that will let Chef read it. Test for yourself with <code>vault auth</code> and <code>vault read</code>!</p>

<p>Now it&rsquo;s time to get Chef to store and read that key. Store the token in some JSON such as <code>secret.json</code>.</p>

<figure class='code'><div class="highlight"><table><tr><td class="gutter"><pre class="line-numbers"><span class='line-number'>1</span>
</pre></td><td class='code'><pre><code class=''><span class='line'>{ "token": "ba85411e-ab76-0c0f-c0b8-e26ce294ae0d"}</span></code></pre></td></tr></table></div></figure>


<p>And create a secret that&rsquo;s accessible to the servers and any people needed:</p>

<figure class='code'><div class="highlight"><table><tr><td class="gutter"><pre class="line-numbers"><span class='line-number'>1</span>
</pre></td><td class='code'><pre><code class=''><span class='line'>knife vault create myapp_credentials vault_token -A sean,server1.example.com -M client -J ./secret.json</span></code></pre></td></tr></table></div></figure>


<p>This creates a secret in a data bag called <code>myapp_credentials</code> in an item called <code>vault_token</code>. The secret itself is a piece of JSON with a key of <code>token</code> and a value of the token itself. The secret is only accessible by <code>sean</code> (me) and <code>server1.example.com</code>. If you later want to add a new server or user to manage it, you need to run</p>

<figure class='code'><div class="highlight"><table><tr><td class="gutter"><pre class="line-numbers"><span class='line-number'>1</span>
</pre></td><td class='code'><pre><code class=''><span class='line'>knife vault update myapp_credentials vault_token -A server2.example.com</span></code></pre></td></tr></table></div></figure>


<p>Which will encrypt the data bag secret with something that only <code>server2.example.com</code> can decrypt.</p>

<p>I won&rsquo;t get into all the details of Chef Vault other than to refer you to <a href="https://blog.chef.io/2016/01/21/chef-vault-what-is-it-and-what-can-it-do-for-you/">this helpful article</a>.</p>

<p>Now, let&rsquo;s get Chef to read that secret within the recipe! Most things in these examples are static strings to make it easier to read. In a real recipe you&rsquo;d likely move them to attributes.</p>

<p>First, get <code>chef-vault</code> into your recipe. Begin by referencing it in <code>metadata.rb</code></p>

<figure class='code'><figcaption><span></span></figcaption><div class="highlight"><table><tr><td class="gutter"><pre class="line-numbers"><span class='line-number'>1</span>
</pre></td><td class='code'><pre><code class='Ruby'><span class='line'><span class="n">depends</span> <span class="s1">&#39;chef-vault&#39;</span>
</span></code></pre></td></tr></table></div></figure>


<p>And in the recipe, include the recipe and use the <code>chef_vault_item</code> helper to read the secret:</p>

<figure class='code'><figcaption><span></span></figcaption><div class="highlight"><table><tr><td class="gutter"><pre class="line-numbers"><span class='line-number'>1</span>
<span class='line-number'>2</span>
<span class='line-number'>3</span>
<span class='line-number'>4</span>
<span class='line-number'>5</span>
</pre></td><td class='code'><pre><code class='Ruby'><span class='line'><span class="n">include_recipe</span> <span class="s1">&#39;chef-vault&#39;</span>
</span><span class='line'>
</span><span class='line'><span class="c1"># The key to unlock the HashiCorp vault is in Chef</span>
</span><span class='line'><span class="n">bag</span> <span class="o">=</span> <span class="n">chef_vault_item</span><span class="p">(</span><span class="s1">&#39;myapp&#39;</span><span class="p">,</span> <span class="s1">&#39;vault_token&#39;</span><span class="p">)</span>
</span><span class='line'><span class="n">vault_token</span> <span class="o">=</span> <span class="n">bag</span><span class="o">[</span><span class="s1">&#39;token&#39;</span><span class="o">]</span>
</span></code></pre></td></tr></table></div></figure>


<p>Now that we have the token to the HashiCorp Vault, we can access the secrets using the <a href="https://github.com/hashicorp/vault-ruby">Vault Rubygem</a>.</p>

<figure class='code'><figcaption><span></span></figcaption><div class="highlight"><table><tr><td class="gutter"><pre class="line-numbers"><span class='line-number'>1</span>
<span class='line-number'>2</span>
<span class='line-number'>3</span>
<span class='line-number'>4</span>
<span class='line-number'>5</span>
<span class='line-number'>6</span>
<span class='line-number'>7</span>
<span class='line-number'>8</span>
<span class='line-number'>9</span>
<span class='line-number'>10</span>
<span class='line-number'>11</span>
<span class='line-number'>12</span>
<span class='line-number'>13</span>
<span class='line-number'>14</span>
<span class='line-number'>15</span>
<span class='line-number'>16</span>
</pre></td><td class='code'><pre><code class='Ruby'><span class='line'><span class="n">vault</span> <span class="o">=</span> <span class="no">Vault</span><span class="o">::</span><span class="no">Client</span><span class="o">.</span><span class="n">new</span><span class="p">(</span><span class="ss">address</span><span class="p">:</span> <span class="s1">&#39;https://vault.example.com:8200&#39;</span><span class="p">)</span>
</span><span class='line'><span class="n">vault</span><span class="o">.</span><span class="n">token</span> <span class="o">=</span> <span class="n">vault_token</span>
</span><span class='line'><span class="c1"># Renew the lease while we&#39;re here otherwise it&#39;ll eventually expire and be useless.</span>
</span><span class='line'><span class="n">vault</span><span class="o">.</span><span class="n">auth_token</span><span class="o">.</span><span class="n">renew_self</span> <span class="mi">3600</span> <span class="o">*</span> <span class="mi">24</span> <span class="o">*</span> <span class="mi">30</span>
</span><span class='line'>
</span><span class='line'><span class="c1"># Take a listing of the secrets in the path we chose earlier</span>
</span><span class='line'><span class="n">vault</span><span class="o">.</span><span class="n">logical</span><span class="o">.</span><span class="n">list</span><span class="p">(</span><span class="s1">&#39;/secret/myapp/&#39;</span><span class="p">)</span><span class="o">.</span><span class="n">each</span> <span class="k">do</span> <span class="o">|</span><span class="nb">name</span><span class="o">|</span>
</span><span class='line'>  <span class="c1"># Extract each individual secret into a hash</span>
</span><span class='line'>  <span class="n">user_data</span> <span class="o">=</span> <span class="n">vault</span><span class="o">.</span><span class="n">logical</span><span class="o">.</span><span class="n">read</span><span class="p">(</span><span class="s2">&quot;/secret/myapp/</span><span class="si">#{</span><span class="nb">name</span><span class="si">}</span><span class="s2">&quot;</span><span class="p">)</span>
</span><span class='line'>  <span class="c1"># Apply the custom resource using parts of the secret</span>
</span><span class='line'>  <span class="n">myapp_user</span> <span class="nb">name</span><span class="o">.</span><span class="n">downcase</span> <span class="k">do</span>
</span><span class='line'>    <span class="n">unix_user</span> <span class="nb">name</span><span class="o">.</span><span class="n">downcase</span>
</span><span class='line'>    <span class="n">password</span> <span class="n">user_data</span><span class="o">.</span><span class="n">data</span><span class="o">[</span><span class="ss">:password</span><span class="o">]</span> <span class="c1"># This is the password in the vault</span>
</span><span class='line'>    <span class="n">path</span> <span class="n">user_data</span><span class="o">.</span><span class="n">data</span><span class="o">[</span><span class="ss">:path</span><span class="o">]</span> <span class="c1"># This is the path from the vault</span>
</span><span class='line'>  <span class="k">end</span>
</span><span class='line'><span class="k">end</span>
</span></code></pre></td></tr></table></div></figure>


<p>The testing story is fairly straightforward. If you&rsquo;re using the <code>chef_vault_item</code> as opposed to directly through <code>ChefVault::Item</code>, then it&rsquo;ll automatically fall back to using unencrypted data bags which are easily mockable. Similarly, HashiCorp Vault can be mocked or pointed to a test instance.</p>

<p>This seems to give a good balance of security and convenience. We manage the Chef specific secrets in the Chef Vault, and use the HashiCorp vault for things that are more general. And the pattern is simple enough to be used in other places.</p>
]]></content>
  </entry>
  
  <entry>
    <title type="html"><![CDATA[Getting Started With Chef]]></title>
    <link href="https://ertw.com/blog/2016/06/03/getting-started-with-chef/"/>
    <updated>2016-06-03T09:41:45-04:00</updated>
    <id>https://ertw.com/blog/2016/06/03/getting-started-with-chef</id>
    <content type="html"><![CDATA[<p>I&rsquo;ve been a proponent of configuration management with Chef for a while. It&rsquo;s done amazing things for me and my workplace and I think everyone could benefit from it. But when I talk to people the question always comes up: &ldquo;How do I get started? Things move slowly here.&rdquo;. I&rsquo;m going to share the plan that worked for me. YMMV.</p>

<p><em>Note</em> - While I talk about Chef, this also goes for Ansible, Salt, Puppet, cfengine, etc.</p>

<h2>The plan</h2>

<p>First, establish a beachhead. Get the Chef agent on all the servers you can, including your snowflakes. Then, start automating your &ldquo;new box&rdquo; workflow so that it&rsquo;s as hands-off as possible and results in a fairly standardized build with Chef on it. Finally, commit to using those new boxes for everything you do.</p>

<p>Once you have this done, you&rsquo;ll immediately be able to prove the value of configuration management. You&rsquo;ll be able to query Chef for things that normally took a while to get (who is running that old kernel version) and be able to automate many ad-hoc tasks (delete that account on all the servers). Over time you can improve to deploy your servers using cookbooks.</p>

<h3>Step 1: Chefify all the current infrastructure</h3>

<p><a href="https://docs.chef.io/install_server.html">Install Chef Server</a> on a separate box. The server is not necessary to get use out of Chef but it makes things easier. More importantly, once you finish this step you&rsquo;ll immediately be able to store configuration management data and run queries on your infrastructure (once they run the Chef client).</p>

<p>Next, <a href="https://docs.chef.io/quick_start.html">create your first cookbook</a> that will be a very sparse configuration that applies to all of your current infrastructure. When I did it I called it <code>role-minimal</code> and went down the <a href="https://www.chef.io/blog/2013/11/19/chef-roles-arent-evil/">role cookbook</a> path. The TL;DR of that is that you create a role that only includes the role cookbook so that you get the benefits of versioning.</p>

<p>What do you put in the minimal role? It can be nothing to start, if you want. Or maybe something that&rsquo;s so benign that no-one could complain, like setting the banner or motd:</p>

<figure class='code'><div class="highlight"><table><tr><td class="gutter"><pre class="line-numbers"><span class='line-number'>1</span>
<span class='line-number'>2</span>
<span class='line-number'>3</span>
<span class='line-number'>4</span>
</pre></td><td class='code'><pre><code class=''><span class='line'>cookbook_file '/etc/motd' do
</span><span class='line'>  source 'motd'
</span><span class='line'>  mode '0644'
</span><span class='line'>end</span></code></pre></td></tr></table></div></figure>


<p>and then put your motd in <code>files/default/motd</code>. This will manage the file and ensure that all nodes have the same MOTD. Who can argue with that? You probably already have an item in your backlog to do that anyway.</p>

<p>The other thing to add to this cookbook is to make the Chef client run on a schedule with <a href="https://supermarket.chef.io/cookbooks/chef-client">the chef-client cookbook</a></p>

<figure class='code'><div class="highlight"><table><tr><td class="gutter"><pre class="line-numbers"><span class='line-number'>1</span>
<span class='line-number'>2</span>
<span class='line-number'>3</span>
<span class='line-number'>4</span>
<span class='line-number'>5</span>
<span class='line-number'>6</span>
<span class='line-number'>7</span>
<span class='line-number'>8</span>
<span class='line-number'>9</span>
<span class='line-number'>10</span>
</pre></td><td class='code'><pre><code class=''><span class='line'>default['chef_client']['init_style'] = 'none'
</span><span class='line'>default['chef_client']['cron'] = {
</span><span class='line'>  minute: '*/30',
</span><span class='line'>  hour: '*',
</span><span class='line'>  path: nil,
</span><span class='line'>  environment_variables: nil,
</span><span class='line'>  log_file: '/dev/null',
</span><span class='line'>  use_cron_d: false,
</span><span class='line'>  mailto: nil
</span><span class='line'>  }</span></code></pre></td></tr></table></div></figure>


<p>That can go in your attributes for the recipe to run it every half hour, or whatever you want. Don&rsquo;t forget to <code>include_recipe 'chef-client::cron'</code> to have Chef manipulate your crontab to add the job.</p>

<p>You may want to <a href="https://docs.chef.io/knife_environment.html">create environments</a> if that&rsquo;s the way you do things.</p>

<p>After this, start bootstrapping your machines with <a href="https://docs.chef.io/knife_bootstrap.html">knife bootstrap</a> and a run list containing your new role. Maybe start with the non production servers. Don&rsquo;t worry too much if people resist, you can leave those servers alone for now.</p>

<p>Now you have Chef running in a low risk fashion. But what&rsquo;s going to happen? Someone will eventually need something:</p>

<ul>
<li>We need to move to LDAP authentication</li>
<li>We need to ensure that we&rsquo;re never running an old version of openssl</li>
<li>We need to know which servers are running which kernels</li>
</ul>


<p>And then you can put up your hand and say it&rsquo;s easy, because you happen to have Chef agents on each server, so the easy way would be to leverage that. Except that server that they were concerned about earlier &ndash; did they want that one done by hand or should we use our new repeatable automated process? Great, I&rsquo;ll just go bootstrap that node.</p>

<h2>Step 2: Fix your provisioning</h2>

<p>This one really depends on how you build new machines. The general idea is that you want to come up with a base machine configuration that everything you do from now on is built from. We use the <a href="https://github.com/chef-partners/knife-vsphere">knife vsphere</a> plugin to create new images with Chef already bootstrapped, but depending on what you use, you may need to <a href="https://github.com/chef-partners">search the plugin directory</a>.</p>

<p>Create a second role for all the new stuff. We call ours <code>role-base</code>. This can be identical to <code>role-minimal</code>, but you may want to add some stuff to make your life easier. For example, I feel it should be a crime to run a server without <code>sar</code>, so I have our base role make sure that the <code>sysstat</code> package is up to date, plus we throw in some other goodies like <code>screen</code>, <code>strace</code>, <code>lsof</code>, and <code>htop</code>.</p>

<p>After this, commit to using this base image wherever humanly possible. Your boxes will be more consistent.</p>

<h2>Step 3: Write cookbooks for new stuff</h2>

<p>Sooner or later you&rsquo;ll have a project that needs some servers. Do what you can to leverage community cookbooks or your own cookbooks to save yourself time and enforce consistency.</p>

<p>The benefit here is that all your MySQL servers will be consistent. You may not be able to fix your old servers, but at least everything new will be consistent. You&rsquo;ll also be able to create new machines or environments much easier because the base image and the apps will be in code and not some checklist in the wiki. You&rsquo;ll spend less time worrying about small details and spend more time thinking about bigger picture items.</p>

<p>I don&rsquo;t have much advice here other than to do it. You&rsquo;re definitely going to learn as you go and make mistakes. But it&rsquo;s code, you can correct it and move on.</p>

<p>The other part of this step is to promote this new tool with your co-workers. Show them how <code>knife</code> tools can make your life easier. Learn how to write cookbooks as a group. Get a culture of reviewing each other&rsquo;s code so you learn new ways of doing things and share information.</p>

<h2>Step 4: while (true) { get_better }</h2>

<p>There&rsquo;s not a while lot to say here. Your first few weeks with Chef are going to be hard, but you&rsquo;ll find that it gives you so many benefits in consistency and speed that it&rsquo;s worth it. Mastering devops practices is an ongoing thing.</p>

<p>I recommend contributing patches back to community cookbooks as a way to get better. You will find problems with other people&rsquo;s cookbooks eventually, and you can submit fixes and have them help other people.</p>

<p>At some point, not doing things in Chef will just seem strange.</p>
]]></content>
  </entry>
  
  <entry>
    <title type="html"><![CDATA[LPI Certification Book Is Out]]></title>
    <link href="https://ertw.com/blog/2015/12/26/lpi-certification-book-is-out/"/>
    <updated>2015-12-26T10:27:58-05:00</updated>
    <id>https://ertw.com/blog/2015/12/26/lpi-certification-book-is-out</id>
    <content type="html"><![CDATA[<p>Ross Brunson and I spent a lot of time working on a study guide for the Linux+ and LPIC-1 certification, and I&rsquo;m happy to say it&rsquo;s finally out. Here&rsquo;s an <a href="http://www.amazon.com/CompTIA-Linux-LPIC-1-Cert-Guide/dp/078975455X/">Amazon link</a>.</p>

<p>I&rsquo;m particularly proud of this one. It started out as an update to Ross&#8217; book from 10 years ago, but in the end we rewrote most of it, expanded other sections, and added a ton of new content to cover the new objectives. Ross is a former employee of LPI so you know this book will cover the right material.</p>
]]></content>
  </entry>
  
  <entry>
    <title type="html"><![CDATA[Canadian Equity Crowdfunding Rules]]></title>
    <link href="https://ertw.com/blog/2015/09/07/canadian-equity-crowdfunding-rules/"/>
    <updated>2015-09-07T09:58:42-04:00</updated>
    <id>https://ertw.com/blog/2015/09/07/canadian-equity-crowdfunding-rules</id>
    <content type="html"><![CDATA[<p>Be forewarned, I&rsquo;m not a lawyer or a securities dealer. I&rsquo;m just an interested person writing down my opinion.</p>

<p>Back in May the Canadian Security Administrators released the <a href="http://www.lautorite.qc.ca/files/pdf/reglementation/valeurs-mobilieres/0-avis-acvm-staff/2015/2015mai14-45-316-avis-acvm-en.pdf">Start-up Crowdfunding
Registration and Prospectus Exemptions</a> (PDF). The core idea is that in certain situations a startup company can sell equity in their company without filing a detailed prospectus or registering as a dealer, often called <em>crowdfunding</em>, though here more properly called <em>equity crowdfunding</em>.</p>

<p>What&rsquo;s the difference? In crowdfunding sites, such as Kickstarter, you give a project money in return for a prize or product. The project is assured a certain amount of sales to cover any capital costs, which should put them on a good footing for later sales. If the project is a success or a bust you don&rsquo;t have any long term interest in the company &ndash; you&rsquo;re basically pre-purchasing a product. In the equity crowdfunding scenario you&rsquo;re buying a piece of the company much like if you bought it on the stock market. If the company does well then your investment may be worth a multiple of the purchase price. If the company does poorly then it&rsquo;s worth nothing.</p>

<p>Normally these types of equity transactions are heavily regulated to prevent fraud and people from preying on novice investors. These new guidelines are an attempt to reduce the regulations while still preserving the investor protection. It should be noted that these only apply to British
Columbia, Saskatchewan, Manitoba, Québec, New Brunswick and Nova Scotia. It is interesting to note that Ontario is developing their own rules.</p>

<p>While there are many conditions in these new equity crowdfunding guidelines the most important are:</p>

<ul>
<li>The <em>issuer</em> (startup company) must write up an <em>offering document</em> containing basic information about the company and the money being raised. No financial statements are required, or even supposed to be attached to the offering document.</li>
<li>Each <em>distribution</em> (fundraising round) can be up to $250,000 and an issuer can only raise twice per calendar year.</li>
<li>A distribution declares a minimum amount it will raise, and it must raise that within 90 days or the money is returned to investors</li>
</ul>


<p>Additionally the investors have some rights and limitations:</p>

<ul>
<li>Can only contribute $1,500 per distribution</li>
<li>Has 48 hours to back out of a decision (either after the initial decision or after any updates have been made to the offering document)</li>
<li>May not be charged a fee for investing (i.e. the issuer must pay any fees)</li>
<li><em>Can not resell their shares</em> unless</li>
<li><ul>
<li>They are sold as part of another distribution</li>
</ul>
</li>
<li><ul>
<li>They are sold under a formal prospectus (e.g. what this system is trying to avoid)</li>
</ul>
</li>
<li><ul>
<li>The company becomes publicly listed and then only after a 4 month hold period expires</li>
</ul>
</li>
</ul>


<p>These distributions are expected to be sold through online portals that are either run by registered dealers or privately.</p>

<p>My take on all this is that it&rsquo;s a good start. My main problem is the low limit on the personal contributions. If you raise $100k you need at least 67 people to buy in. I realize there must be a limitation to protect the downside but it seems it could have been a lot higher, maybe as much as $5,000. You now have 67 investors to manage, though you can make sure that the shares being issued to this class of shareholders has very few rights. If you go for institutional funding after a crowdfunded round then this may complicate things.</p>
]]></content>
  </entry>
  
  <entry>
    <title type="html"><![CDATA[Thinking About Cyber Security]]></title>
    <link href="https://ertw.com/blog/2015/01/06/thinking-about-cyber-security/"/>
    <updated>2015-01-06T11:47:32-06:00</updated>
    <id>https://ertw.com/blog/2015/01/06/thinking-about-cyber-security</id>
    <content type="html"><![CDATA[<p>There have been a lot of <a href="https://www.singlehop.com/blog/5-industries-devastated-by-data-breaches-in-2014/">high profile security breaches lately</a>. If people like Sony can get hacked, what chance do you have?</p>

<p>The people at Sony are humans. They get together at the water cooler and complain about the state of affairs and all the legacy applications they have to support. Even new companies like Dropbox are going to have dark corners in their applications. Money isn&rsquo;t going to solve all these problems - Apple has billions of dollars and still gave up information about users. The bigger the company, the bigger the attack surface and the more the team has to defend.</p>

<p>How do you prevent your company or product from being hacked given your resources are finite and you may not be able to change everything you want to?</p>

<p>I&rsquo;ve been thinking of how Agile methods such as rapid iteration and sprints could be applied to security.  With that in mind, some high level principles:</p>

<ul>
<li>Solutions to problems should be ranked in terms of business value</li>
<li>If a solution takes more than a week or two to implement, it should be broken down into individual phases with their own business value scores</li>
<li>It&rsquo;s not necessary to completely solve the problem as long as you&rsquo;re better off than you were before. You can make it better the next iteration</li>
<li>Instead of &ldquo;how can we eliminate all risk?&rdquo; the better question is &ldquo;how can we make an attacker&rsquo;s work more difficult?&rdquo;</li>
<li>Detection is just as important as prevention. Look at safes &ndash; they protect valuables against a determined adversary for a given period of time, it&rsquo;s still up to you to make sure you can react in that timeframe</li>
</ul>


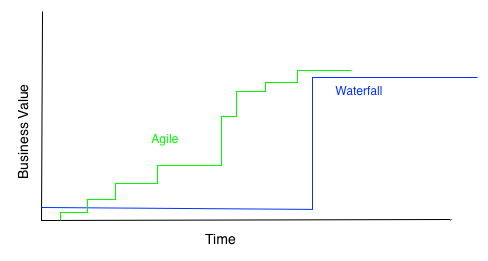
<p>The list above is trying to get away from the traditional security project where you spend lots of time producing documentation, shelve it, and then provide a half-assed solution to meet the deadline. Instead you break the solution into parts and try and continually produce business value. Time for a diagram:</p>

<p><img src="https://ertw.com/blog/images/agilevwaterfall.png" alt="agile vs waterfall" /></p>

<p>Even in the best case where you deliver full value, why not try to deliver parts of it sooner?</p>

<p>Look at it this way &ndash; at any point in time you know the least amount about your problem as you ever will. It&rsquo;s folly to think you can solve them all with some mammoth project. Pick something, fix it, move on. You have an end goal for sure, but the path may change as you progress.</p>

<p>With that in mind, how do you figure out what to do?</p>

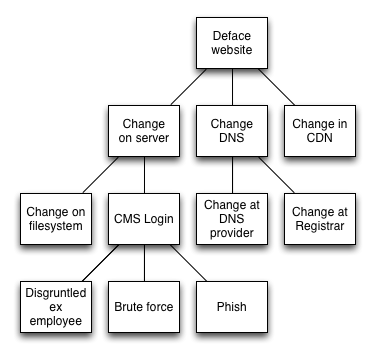
<p>One organization technique I&rsquo;ve found helpful is the <a href="http://en.wikipedia.org/wiki/Attack_tree">attack tree</a>. Here you define the goal of the attacker: Steal some money, take down the site, and so forth. Then you start coming up with some high level tasks the attacker would have to do in order to accomplish the goal. The leaf nodes are the more actionable things. For example, consider what it would take to deface a website:</p>

<p><img src="https://ertw.com/blog/images/attack_tree_deface_website.png" alt="attack tree to deface website" /></p>

<p>While not totally complete, this attack tree shows where the attack points are. Given that, some low effort and high value activities that could be done:</p>

<ul>
<li>Audit who has access to CDN, DNS, and registrar accounts</li>
<li>Audit CMS accounts</li>
</ul>


<p>Some higher effort activities would then be:</p>

<ul>
<li>Code fix to enforce strong passwords</li>
<li>Code fix to lock out accounts after a certain period</li>
<li>Code fix to centralize the authentication to the corporate directory</li>
<li>Investigate two factor or SAML login with hosting providers</li>
<li>Network fix to ban IPs after a certain number of attempts</li>
<li>Monitor failed login attempts and investigate manually</li>
</ul>


<p>Some of those options may be a lot of work. But if you first start with a simple password policy, build on that in the next iteration to lock out accounts, and finally tie in to another directory, you&rsquo;re able to incrementally improve by making small fixes and learning as you go.</p>

<p>What if a group like Anonymous threatens to attack your website on the weekend? Look at the attack tree, what kind of confusion can you throw at the attacker? Change the URL of the login page? Put up a static password on the web server to view the login screen itself? Security through obscurity is not a long term fix, but as a tactical approach it can be enough to get you past a hurdle.</p>

<p>Too often security projects are treated in a waterfall manner. You must figure everything out front and then implement the solution, with the business value delivered at the end. Instead, treat this all as a continual learning exercise and strive to add value at each iteration. If the situation changes in the middle of the project, like an imminent threat, you&rsquo;re in a better position to change course and respond.</p>
]]></content>
  </entry>
  
  <entry>
    <title type="html"><![CDATA[Test Driven Infrastructure]]></title>
    <link href="https://ertw.com/blog/2014/12/29/test-driven-infrastructure/"/>
    <updated>2014-12-29T19:02:57-06:00</updated>
    <id>https://ertw.com/blog/2014/12/29/test-driven-infrastructure</id>
    <content type="html"><![CDATA[<p>In software, test driven development happens when you write an automated test that proves what you are about to write is correct, you write the code to make the test pass, then you move on to the next thing. Even if you don&rsquo;t follow that strict order (e.g. write your code, then write a test), the fact that there&rsquo;s a durable test that you can run later to prove the system still works is very valuable. All the tests together give you a suite of tools to help prove that you have done the right thing and that regressions haven&rsquo;t happened.</p>

<p>What about the infrastructure world? We&rsquo;ve always had some variant of &ldquo;can you ping it now?&rdquo;, or some high level Nagios tests. But there&rsquo;s still some value to knowing that your test was good &ndash; if you make a change and then test, how can you be sure your test is good? If you ran the same test first you&rsquo;d know it failed, then you could make your change. And then there&rsquo;s the regression suite. A suite of tests that may be too expensive to run every 5 minutes through Nagios but are great to run to verify your change didn&rsquo;t break anything.</p>

<p>Enter the <a href="https://github.com/sstephenson/bats">Bash Automated Test System</a> - a Bash based test suite. It&rsquo;s a thin wrapper around the commands that you&rsquo;d normally run in a script but if you follow the conventions you get some easy to use helpers and an easy to interpret output.</p>

<p>As an example, I needed to configure an nginx web server to perform a complicated series of redirects based on the user agent and link. I had a list of &ldquo;if this then that&rdquo; type instructions from the developer but had to translate them into a set of cURL commands. Once I had that it was simple to translate them into a BATS test that I could use to prove the system was working as requested and ideally share with my team so they could verify correctness if they made changes.</p>

<figure class='code'><figcaption><span>share_link tests</span></figcaption><div class="highlight"><table><tr><td class="gutter"><pre class="line-numbers"><span class='line-number'>1</span>
<span class='line-number'>2</span>
<span class='line-number'>3</span>
<span class='line-number'>4</span>
<span class='line-number'>5</span>
<span class='line-number'>6</span>
<span class='line-number'>7</span>
<span class='line-number'>8</span>
<span class='line-number'>9</span>
<span class='line-number'>10</span>
<span class='line-number'>11</span>
<span class='line-number'>12</span>
<span class='line-number'>13</span>
<span class='line-number'>14</span>
<span class='line-number'>15</span>
<span class='line-number'>16</span>
<span class='line-number'>17</span>
<span class='line-number'>18</span>
<span class='line-number'>19</span>
<span class='line-number'>20</span>
<span class='line-number'>21</span>
<span class='line-number'>22</span>
<span class='line-number'>23</span>
<span class='line-number'>24</span>
<span class='line-number'>25</span>
<span class='line-number'>26</span>
<span class='line-number'>27</span>
<span class='line-number'>28</span>
<span class='line-number'>29</span>
<span class='line-number'>30</span>
<span class='line-number'>31</span>
<span class='line-number'>32</span>
<span class='line-number'>33</span>
<span class='line-number'>34</span>
<span class='line-number'>35</span>
<span class='line-number'>36</span>
<span class='line-number'>37</span>
<span class='line-number'>38</span>
<span class='line-number'>39</span>
<span class='line-number'>40</span>
<span class='line-number'>41</span>
<span class='line-number'>42</span>
</pre></td><td class='code'><pre><code class='Bash'><span class='line'><span class="c">#!/usr/bin/env bats</span>
</span><span class='line'>
</span><span class='line'>@test <span class="s2">&quot;root&quot;</span> <span class="o">{</span>
</span><span class='line'>  run curl http://example.com
</span><span class='line'>  <span class="o">[[</span> <span class="nv">$output</span> <span class="o">=</span>~ <span class="s2">&quot;doctype html&quot;</span> <span class="o">]]</span>
</span><span class='line'><span class="o">}</span>
</span><span class='line'>
</span><span class='line'>@test <span class="s2">&quot;mobile redirects to share&quot;</span> <span class="o">{</span>
</span><span class='line'>  run curl -H <span class="s2">&quot;User-Agent: this is an iphone&quot;</span> -i -k http://app.example.com/shareapp/65ac7f12-ac2e-43f4-8b09-b3359137f36c
</span><span class='line'>  <span class="o">[[</span> <span class="nv">$output</span> <span class="o">=</span>~ <span class="s2">&quot;302 Found&quot;</span> <span class="o">]]</span>
</span><span class='line'>  <span class="o">[[</span> <span class="nv">$output</span> <span class="o">=</span>~ <span class="s2">&quot;Location: http://app.example.com/share/65ac7f12-ac2e-43f4-8b09-b3359137f36c&quot;</span> <span class="o">]]</span>
</span><span class='line'><span class="o">}</span>
</span><span class='line'>
</span><span class='line'>@test <span class="s2">&quot;mobile redirects to share and keeps query string&quot;</span> <span class="o">{</span>
</span><span class='line'>  run curl -H <span class="s2">&quot;User-Agent: this is an iphone&quot;</span> -i -k http://app.example.com/shareapp/65ac7f12-ac2e-43f4-8b09-b3359137f36c?a<span class="o">=</span>b
</span><span class='line'>  <span class="o">[[</span> <span class="nv">$output</span> <span class="o">=</span>~ <span class="s2">&quot;302 Found&quot;</span> <span class="o">]]</span>
</span><span class='line'>  <span class="o">[[</span> <span class="nv">$output</span> <span class="o">=</span>~ <span class="s2">&quot;Location: http://app.example.com/share/65ac7f12-ac2e-43f4-8b09-b3359137f36c?a=b&quot;</span> <span class="o">]]</span>
</span><span class='line'><span class="o">}</span>
</span><span class='line'>
</span><span class='line'>@test <span class="s2">&quot;desktop redirects to play&quot;</span> <span class="o">{</span>
</span><span class='line'>  run curl -H <span class="s2">&quot;User-Agent: dunno bob&quot;</span> -i -k http://app.example.com/shareapp/65ac7f12-ac2e-43f4-8b09-b3359137f36c
</span><span class='line'>  <span class="o">[[</span> <span class="nv">$output</span> <span class="o">=</span>~ <span class="s2">&quot;302 Found&quot;</span> <span class="o">]]</span>
</span><span class='line'>  <span class="o">[[</span> <span class="nv">$output</span> <span class="o">=</span>~ <span class="s2">&quot;Location: http://app.example.com/play/65ac7f12-ac2e-43f4-8b09-b3359137f36c&quot;</span> <span class="o">]]</span>
</span><span class='line'><span class="o">}</span>
</span><span class='line'>
</span><span class='line'>@test <span class="s2">&quot;desktop redirects to play and keeps query string&quot;</span> <span class="o">{</span>
</span><span class='line'>  run curl -H <span class="s2">&quot;User-Agent: dunno bob&quot;</span> -i -k http://app.example.com/shareapp/65ac7f12-ac2e-43f4-8b09-b3359137f36c?a<span class="o">=</span>b
</span><span class='line'>  <span class="o">[[</span> <span class="nv">$output</span> <span class="o">=</span>~ <span class="s2">&quot;302 Found&quot;</span> <span class="o">]]</span>
</span><span class='line'>  <span class="o">[[</span> <span class="nv">$output</span> <span class="o">=</span>~ <span class="s2">&quot;Location: http://app.example.com/play/65ac7f12-ac2e-43f4-8b09-b3359137f36c?a=b&quot;</span> <span class="o">]]</span>
</span><span class='line'><span class="o">}</span>
</span><span class='line'>
</span><span class='line'>@test <span class="s2">&quot;bots redirect to main site&quot;</span> <span class="o">{</span>
</span><span class='line'>  run curl -H <span class="s2">&quot;User-Agent: facebookexternalhit&quot;</span> -i -k http://app.example.com/shareapp/65ac7f12-ac2e-43f4-8b09-b3359137f36c
</span><span class='line'>  <span class="o">[[</span> <span class="nv">$output</span> <span class="o">=</span>~ <span class="s2">&quot;302 Found&quot;</span> <span class="o">]]</span>
</span><span class='line'>  <span class="o">[[</span> <span class="nv">$output</span> <span class="o">=</span>~ <span class="s2">&quot;Location: http://www.example.com/app/social?id=65ac7f12-ac2e-43f4-8b09-b3359137f36c&quot;</span> <span class="o">]]</span>
</span><span class='line'><span class="o">}</span>
</span><span class='line'>
</span><span class='line'>@test <span class="s2">&quot;bots redirect to main site and keeps query string&quot;</span> <span class="o">{</span>
</span><span class='line'>  run curl -H <span class="s2">&quot;User-Agent: facebookexternalhit&quot;</span> -i -k http://app.example.com/shareapp/65ac7f12-ac2e-43f4-8b09-b3359137f36c?a<span class="o">=</span>b
</span><span class='line'>  <span class="o">[[</span> <span class="nv">$output</span> <span class="o">=</span>~ <span class="s2">&quot;302 Found&quot;</span> <span class="o">]]</span>
</span><span class='line'>  <span class="o">[[</span> <span class="nv">$output</span> <span class="o">=</span>~ <span class="s2">&quot;Location: http://www.example.com/app/social?id=65ac7f12-ac2e-43f4-8b09-b3359137f36c&amp;a=b&quot;</span> <span class="o">]]</span>
</span><span class='line'><span class="o">}</span>
</span></code></pre></td></tr></table></div></figure>


<p>And running the tests with one mistake in the configuration:</p>

<pre><code class="Bash">$ bats ~/Downloads/share_link.bats
 ✓ root
 ✓ mobile redirects to share
 ✗ mobile redirects to share and keeps query string
   (in test file /Users/sean/Downloads/share_link.bats, line 17)
     `[[ $output =~ "301 Found" ]]' failed
 ✓ desktop redirects to play
 ✓ desktop redirects to play and keeps query string
 ✓ bots redirect to ndc
 ✓ bots redirect to ndc and keeps query string

 7 tests, 1 failure
</code></pre>

<p> With the tests in place it&rsquo;s more clear when the configurations are correct.</p>

<p> As a bonus, if you use <a href="http://kitchen.ci/">Test Kitchen</a> for your Chef recipes, you can include BATS style tests that will be run. So if this configuration is in Chef (which it was) I can have my CI system run these tests if the cookbook changes (which I don&rsquo;t yet).</p>
]]></content>
  </entry>
  
  <entry>
    <title type="html"><![CDATA[Using Google Universal Analytics With NationBuilder]]></title>
    <link href="https://ertw.com/blog/2014/10/25/using-google-universal-analytics-with-nationbuilder/"/>
    <updated>2014-10-25T12:46:09-05:00</updated>
    <id>https://ertw.com/blog/2014/10/25/using-google-universal-analytics-with-nationbuilder</id>
    <content type="html"><![CDATA[<p>We spent a lot of time trying to understand our visitors at <a href="http://bowmanforwinnipeg.ca">Bowman for Winnipeg</a> and part of that was using Google Analytics. The site was built with <a href="http://nationbuilder.com">NationBuilder</a> but they only support the async version of Analytics and it&#8217;s difficult to customize. In particular, we used the demographic and remarketing extensions and there was no easy way to alter the generated javascript to get it to work.</p>


<p>Normally you&#8217;d just turn off your platform&#8217;s analytics plugins and do it yourself, but NationBuilder has a great feature that fires virtual page views when people fill out forms, and we wanted to use that for goal tracking.</p>


<p>The solution was to turn off NationBuilder&#8217;s analytics and do it ourselves but write some hooks to translate any async calls into universal calls. Even with analytics turned off in our NationBuilder account, they&#8217;d fire the conversion events so this worked out well.</p>


<p>In the beginning of our template:</p>


<figure class='code'><figcaption><span>Header code</span></figcaption><div class="highlight"><table><tr><td class="gutter"><pre class="line-numbers"><span class='line-number'>1</span>
<span class='line-number'>2</span>
<span class='line-number'>3</span>
<span class='line-number'>4</span>
<span class='line-number'>5</span>
<span class='line-number'>6</span>
<span class='line-number'>7</span>
<span class='line-number'>8</span>
<span class='line-number'>9</span>
<span class='line-number'>10</span>
<span class='line-number'>11</span>
<span class='line-number'>12</span>
</pre></td><td class='code'><pre><code class='Javascript'><span class='line'><span class="o">&lt;</span><span class="nx">script</span> <span class="nx">type</span><span class="o">=</span><span class="s2">&quot;text/javascript&quot;</span><span class="o">&gt;</span>
</span><span class='line'>  <span class="kd">var</span> <span class="nx">_gaq</span> <span class="o">=</span> <span class="nx">_gaq</span> <span class="o">||</span> <span class="p">[];</span> <span class="c1">// leave for legacy compatibility</span>
</span><span class='line'>   <span class="kd">var</span> <span class="nx">engagement</span> <span class="o">=</span> <span class="p">{</span><span class="o">%</span> <span class="k">if</span> <span class="nx">request</span><span class="p">.</span><span class="nx">logged_in</span><span class="o">?</span> <span class="o">%</span><span class="p">}</span><span class="s2">&quot;member&quot;</span><span class="p">{</span><span class="o">%</span> <span class="k">else</span> <span class="o">%</span><span class="p">}</span><span class="s2">&quot;public&quot;</span><span class="p">{</span><span class="o">%</span> <span class="nx">endif</span> <span class="o">%</span><span class="p">};</span>
</span><span class='line'>  <span class="p">(</span><span class="kd">function</span><span class="p">(</span><span class="nx">i</span><span class="p">,</span><span class="nx">s</span><span class="p">,</span><span class="nx">o</span><span class="p">,</span><span class="nx">g</span><span class="p">,</span><span class="nx">r</span><span class="p">,</span><span class="nx">a</span><span class="p">,</span><span class="nx">m</span><span class="p">){</span><span class="nx">i</span><span class="p">[</span><span class="s1">&#39;GoogleAnalyticsObject&#39;</span><span class="p">]</span><span class="o">=</span><span class="nx">r</span><span class="p">;</span><span class="nx">i</span><span class="p">[</span><span class="nx">r</span><span class="p">]</span><span class="o">=</span><span class="nx">i</span><span class="p">[</span><span class="nx">r</span><span class="p">]</span><span class="o">||</span><span class="kd">function</span><span class="p">(){</span>
</span><span class='line'>  <span class="p">(</span><span class="nx">i</span><span class="p">[</span><span class="nx">r</span><span class="p">].</span><span class="nx">q</span><span class="o">=</span><span class="nx">i</span><span class="p">[</span><span class="nx">r</span><span class="p">].</span><span class="nx">q</span><span class="o">||</span><span class="p">[]).</span><span class="nx">push</span><span class="p">(</span><span class="nx">arguments</span><span class="p">)},</span><span class="nx">i</span><span class="p">[</span><span class="nx">r</span><span class="p">].</span><span class="nx">l</span><span class="o">=</span><span class="mi">1</span><span class="o">*</span><span class="k">new</span> <span class="nb">Date</span><span class="p">();</span><span class="nx">a</span><span class="o">=</span><span class="nx">s</span><span class="p">.</span><span class="nx">createElement</span><span class="p">(</span><span class="nx">o</span><span class="p">),</span>
</span><span class='line'>  <span class="nx">m</span><span class="o">=</span><span class="nx">s</span><span class="p">.</span><span class="nx">getElementsByTagName</span><span class="p">(</span><span class="nx">o</span><span class="p">)[</span><span class="mi">0</span><span class="p">];</span><span class="nx">a</span><span class="p">.</span><span class="nx">async</span><span class="o">=</span><span class="mi">1</span><span class="p">;</span><span class="nx">a</span><span class="p">.</span><span class="nx">src</span><span class="o">=</span><span class="nx">g</span><span class="p">;</span><span class="nx">m</span><span class="p">.</span><span class="nx">parentNode</span><span class="p">.</span><span class="nx">insertBefore</span><span class="p">(</span><span class="nx">a</span><span class="p">,</span><span class="nx">m</span><span class="p">)</span>
</span><span class='line'>  <span class="p">})(</span><span class="nb">window</span><span class="p">,</span><span class="nb">document</span><span class="p">,</span><span class="s1">&#39;script&#39;</span><span class="p">,</span><span class="s1">&#39;//www.google-analytics.com/analytics.js&#39;</span><span class="p">,</span><span class="s1">&#39;ga&#39;</span><span class="p">);</span>
</span><span class='line'>  <span class="nx">ga</span><span class="p">(</span><span class="s1">&#39;create&#39;</span><span class="p">,</span> <span class="s1">&#39;UA-XXXXXXXX-1&#39;</span><span class="p">,</span> <span class="s1">&#39;www.bowmanforwinnipeg.ca&#39;</span><span class="p">);</span>
</span><span class='line'>  <span class="nx">ga</span><span class="p">(</span><span class="s1">&#39;require&#39;</span><span class="p">,</span> <span class="s1">&#39;displayfeatures&#39;</span><span class="p">);</span>
</span><span class='line'>  <span class="nx">ga</span><span class="p">(</span><span class="s1">&#39;require&#39;</span><span class="p">,</span> <span class="s1">&#39;linkid&#39;</span><span class="p">,</span> <span class="s1">&#39;linkid.js&#39;</span><span class="p">);</span>
</span><span class='line'>  <span class="nx">ga</span><span class="p">(</span><span class="s1">&#39;send&#39;</span><span class="p">,</span> <span class="s1">&#39;pageview&#39;</span><span class="p">,</span> <span class="p">{</span> <span class="s2">&quot;dimension1&quot;</span><span class="o">:</span> <span class="nx">engagement</span><span class="p">});</span>
</span><span class='line'><span class="p">}</span>
</span></code></pre></td></tr></table></div></figure>


<p>It&#8217;s pretty vanilla Google Analytics code with a couple of features &#8211; <a href="https://developers.google.com/analytics/devguides/collection/analyticsjs/display-features">display features</a> for layering on demographic features and retargeting integration and the <a href="https://support.google.com/analytics/answer/2558867?hl=en">enhanced link attribution</a> for better tracking of clicks within the site. We also added a <a href="https://developers.google.com/analytics/devguides/platform/customdimsmets">custom dimension</a> so we could separate out people who took the time to create an account in our nation vs those that were public.</p>


<p>Then, at the bottom:</p>


<figure class='code'><figcaption><span>Footer code</span></figcaption><div class="highlight"><table><tr><td class="gutter"><pre class="line-numbers"><span class='line-number'>1</span>
<span class='line-number'>2</span>
<span class='line-number'>3</span>
<span class='line-number'>4</span>
</pre></td><td class='code'><pre><code class='Javascript'><span class='line'> <span class="nx">$</span><span class="p">(</span><span class="kd">function</span><span class="p">()</span> <span class="p">{</span>
</span><span class='line'>    <span class="c1">// Send anything NB tried to inject</span>
</span><span class='line'>    <span class="k">for</span><span class="p">(</span><span class="nx">i</span> <span class="k">in</span> <span class="nx">_gaq</span><span class="p">)</span> <span class="p">{</span> <span class="kd">var</span> <span class="nx">c</span> <span class="o">=</span> <span class="nx">_gaq</span><span class="p">[</span><span class="nx">i</span><span class="p">];</span> <span class="k">if</span><span class="p">(</span><span class="nx">c</span><span class="p">[</span><span class="mi">0</span><span class="p">]</span> <span class="o">==</span> <span class="s2">&quot;_trackPageview&quot;</span><span class="p">){</span> <span class="nx">ga</span><span class="p">(</span><span class="s1">&#39;send&#39;</span><span class="p">,</span> <span class="s1">&#39;pageview&#39;</span><span class="p">,</span> <span class="nx">c</span><span class="p">[</span><span class="mi">1</span><span class="p">])</span> <span class="p">}</span> <span class="p">}</span>
</span><span class='line'>  <span class="p">});</span>
</span></code></pre></td></tr></table></div></figure>


<p>That&#8217;s a simple loop that iterates through the _gaq array (that the async version of the tracker uses as an event queue) and pushes out any page views using the universal API. We didn&#8217;t have to worry about the initial page view because turning off NationBuilder&#8217;s analytics feature removes all of that.</p>

]]></content>
  </entry>
  
  <entry>
    <title type="html"><![CDATA[Review: Agile Web Development With Rails 4]]></title>
    <link href="https://ertw.com/blog/2013/11/21/review-agile-web-development-with-rails-4/"/>
    <updated>2013-11-21T22:20:27-06:00</updated>
    <id>https://ertw.com/blog/2013/11/21/review-agile-web-development-with-rails-4</id>
    <content type="html"><![CDATA[<p>I had the good fortune to receive <u>Agile Web Development with Rails 4</u> from the publisher to review.</p>


<p>The book is really two books in one. The first is a walkthrough of building a simple Rails 4 application for an online bookstore. The second is a component by component look at Rails 4. If you want to be generous there&#8217;s a quick introduction to Ruby and Rails concepts at the beginning of the book.</p>


<p>The online bookstore walkthrough is interesting especially if you are new to Rails and the ideas behind Agile development. You take the role of a developer who is building an online bookstore for a client. You start off with a general idea of what needs to be done, but you build it incrementally, showing it to your customer at each step. Based on feedback you decide what to tackle next, such as showing pictures, getting details, or adding a shopping cart. Along the way there are some discussions of deployment, internationalization, authentication, and sending email.</p>


<p>Through the examples you learn the basics of creating Rails models, views, and controllers. Though the examples lean heavily on scaffolding to automatically generate the CRUD actions, you do extend it somewhat to handle XML and JSON responses. You also do some AJAX and automated testing. The book does stick pretty closely to the default Rails toolset including the test framework, though at the very end of the book there are some quick examples on using HAML for views.</p>


<p>At the end of each chapter are some exercises. Unlike many other books I found them to be of appropriate difficulty, with answers available online.</p>


<p>The second half of the book is a detailed look at the components of Rails. This is the more technical part of the book as it gets into specifics of how a request is processed and how a response is generated. There&#8217;s no bookstore application anymore, it&#8217;s just discussion of what&#8217;s available, code samples, and diagrams.</p>


<p>Along the way there are some interesting sidebars that explain some of the Rails philosophies or some real world scenarios. For example, one of the sidebars talks about when you want to use a database lookup that raises an exception on failure versus one that returns a nil or an empty set.</p>


<p>I didn&#8217;t read any of the previous editions so I can&#8217;t say with authority how much has changed. The book is up to date on the many changes that came in Rails 4 so it is current in that respect. However there are times when you read it and some older terminology, like fragment or page caching, creep in. This is more a matter of editing than it is about it being out of date, as the associated examples are correct. The index is fairly weak &#8211; many of the terms I tried to look up, including those featured on the back cover, were not found.</p>


<p>If you&#8217;re an experienced Rails developer this book will not help you much. But if you&#8217;re looking to get into Ruby on Rails, either from another language or even with a weak programming background, this book is an excellent way to get started. At a little over 400 pages it&#8217;ll take you a few weekends to get through depending on your skill level.</p>

]]></content>
  </entry>
  
  <entry>
    <title type="html"><![CDATA[Using an IP Phone With Twilio]]></title>
    <link href="https://ertw.com/blog/2013/11/05/using-an-ip-phone-with-twilio/"/>
    <updated>2013-11-05T14:40:20-06:00</updated>
    <id>https://ertw.com/blog/2013/11/05/using-an-ip-phone-with-twilio</id>
    <content type="html"><![CDATA[<h2>This article is now outdated.</h2>


<p>Twilio has added more features to their SIP calling since this article was written, and there&#8217;s a much easier way to <a href="https://www.twilio.com/blog/registering-sip-phone-twilio-inbound-outbound">connect a SIP phone to Twilio</a> that you should use.


<p>Twilio has supported SIP termination <a href="https://www.twilio.com/blog/2013/03/teach-your-old-box-new-tricks-introducing-sip-from-twilio.html">for a while</a> but recently announced SIP origination. This means that previously you could receive calls with SIP but now you can also make calls from a hard phone using SIP instead of using the browser client or going through the PSTN.</p>
<p>It was this second announcement that got my interest. I have an IP phone that I use in my office, currently it&#8217;s through <a href="http://les.net">Les.net</a> but I like the pricing and interface of Twilio and would rather use them.</p>
<p>For some reason everything I read about SIP and Twilio uses a separate SIP proxy even if they have a compliant SIP device. Even their own blog <a href="https://www.twilio.com/blog/2013/03/build-a-twilio-hard-phone-with-sip-from-twilio-raspberry-pi-asterisk-freepbx-and-the-obihai-obi100.html">takes a working SIP ATA and puts it behind Asterisk</a>. I knew I could do better.</p>
<h2>What you&#8217;ll need</h2></p>


<ul>
<li>An IP phone. I used a Cisco 7960 converted to SIP</li>
<li>A publicly available web server running PHP (feel free to use another language, we have to do some basic processing of the request so static won&#8217;t work)</li>
<li>A Twilio account</li><br />
</ul>


<p></p></p>

<p>When thinking about VoIP, always think in two directions. Inbound and outbound. Sending and receiving. Talking and listening.</p>


<h2>Receiving calls</h2>


<p></p></p>

<p>Get a number and point the Voice Request URL to your web server. Please don&#8217;t use mine.</p>


<p><a href="https://ertw.com/blog/blog/wp-content/uploads/2013/10/Phone-Number-Dashboard-Twilio-2013-10-21-08-04-09.jpg"><img src="https://ertw.com/blog/blog/wp-content/uploads/2013/10/Phone-Number-Dashboard-Twilio-2013-10-21-08-04-09-300x67.jpg" alt="Phone Number | Dashboard | Twilio 2013-10-21 08-04-09" width="300" height="67" class="alignnone size-medium wp-image-530" /></a></p>


<p>Your outbound.php script will send some TwiML to dial your phone:</p>


<figure class='code'><figcaption><span></span></figcaption><div class="highlight"><table><tr><td class="gutter"><pre class="line-numbers"><span class='line-number'>1</span>
<span class='line-number'>2</span>
<span class='line-number'>3</span>
<span class='line-number'>4</span>
<span class='line-number'>5</span>
<span class='line-number'>6</span>
<span class='line-number'>7</span>
<span class='line-number'>8</span>
</pre></td><td class='code'><pre><code class='XML'><span class='line'><span class="cp">&lt;?xml version=&quot;1.0&quot; encoding=&quot;UTF-8&quot;?&gt;</span>
</span><span class='line'><span class="nt">&lt;Response&gt;</span>
</span><span class='line'><span class="nt">&lt;Dial&gt;</span>
</span><span class='line'>    <span class="nt">&lt;Sip&gt;</span>
</span><span class='line'>        sip:line_number@address_of_phone
</span><span class='line'>    <span class="nt">&lt;/Sip&gt;</span>
</span><span class='line'><span class="nt">&lt;/Dial&gt;</span>
</span><span class='line'><span class="nt">&lt;/Response&gt;</span>
</span></code></pre></td></tr></table></div></figure>


<p><b>Note:</b> this part was a lot of trouble. After some packet tracing and some brilliant detective work by Brian from Twilio support, it turns out that the address of the phone in the SIP invite had to be an IP address, not a hostname. With a hostname the phone received the INVITE but always returned 404.</p>


<p>Your phone will need to be on the Internet, either with a public address or with UDP port 5060 port forwarded to it. The &#8220;line_number&#8221; has to match the name of the line on your phone. In my case, I named my line after my phone number:</p>


<figure class='code'><figcaption><span></span></figcaption><div class="highlight"><table><tr><td class="gutter"><pre class="line-numbers"><span class='line-number'>1</span>
<span class='line-number'>2</span>
<span class='line-number'>3</span>
<span class='line-number'>4</span>
<span class='line-number'>5</span>
</pre></td><td class='code'><pre><code class='XML'><span class='line'>proxy2_address: &quot;ertw.sip.twilio.com&quot;
</span><span class='line'>line2_name: &quot;204xxxxxxx&quot;
</span><span class='line'>line2_shortname: &quot;204xxxxxxx&quot;
</span><span class='line'>line2_displayname: &quot;204xxxxxxx&quot;
</span><span class='line'>line2_authname: &quot;204xxxxxxx&quot;
</span></code></pre></td></tr></table></div></figure>


<p>One thing to note is that you don&#8217;t register your phone to Twilio. I left the proxy address there so that the requests will keep the NAT translation alive. After detailed packet tracing it looks like the Twilio SIP messages originate from different IP addresses so this might not be helping as much as I thought.</p>


<p>At this point you should be able to dial your Twilio number from a regular phone. Twilio will request inbound.php and then do a SIP INVITE to the phone. The phone will accept it and then you have voice!</p>


<h2>Making calls</h2>


<p></p></p>

<p>The first step is to set up a SIP domain in Twilio:</p>


<p><a href="https://ertw.com/blog/blog/wp-content/uploads/2013/10/Twilio-User-Account-Sip-Domains-2013-10-21-08-15-14.jpg"><img src="https://ertw.com/blog/blog/wp-content/uploads/2013/10/Twilio-User-Account-Sip-Domains-2013-10-21-08-15-14-300x49.jpg" alt="Twilio User - Account Sip Domains 2013-10-21 08-15-14" width="300" height="49" class="alignnone size-medium wp-image-535" /></a></p>


<p>Call it whatever you want, but you&#8217;ll need to set the Voice URL.</p>


<p><a href="https://ertw.com/blog/blog/wp-content/uploads/2013/10/Twilio-User-Account-Sip-Domains-2013-10-21-08-15-57.jpg"><img src="https://ertw.com/blog/blog/wp-content/uploads/2013/10/Twilio-User-Account-Sip-Domains-2013-10-21-08-15-57-300x62.jpg" alt="Twilio User - Account Sip Domains 2013-10-21 08-15-57" width="300" height="62" class="alignnone size-medium wp-image-536" /></a></p>


<p>The script you point it at has to parse the data coming in from Twilio to find the phone number and then issue a Dial instruction to get Twilio to dial the phone and connect the two ends.</p>


<figure class='code'><figcaption><span></span></figcaption><div class="highlight"><table><tr><td class="gutter"><pre class="line-numbers"><span class='line-number'>1</span>
<span class='line-number'>2</span>
<span class='line-number'>3</span>
<span class='line-number'>4</span>
<span class='line-number'>5</span>
<span class='line-number'>6</span>
<span class='line-number'>7</span>
<span class='line-number'>8</span>
<span class='line-number'>9</span>
<span class='line-number'>10</span>
<span class='line-number'>11</span>
<span class='line-number'>12</span>
<span class='line-number'>13</span>
<span class='line-number'>14</span>
</pre></td><td class='code'><pre><code class='PHP'><span class='line'><span class="o">&lt;?</span><span class="nx">php</span>
</span><span class='line'>  <span class="nv">$called</span> <span class="o">=</span> <span class="nb">preg_replace</span><span class="p">(</span><span class="s1">&#39;/sip:1?(.*?)@.*/&#39;</span><span class="p">,</span> <span class="s1">&#39;{$1}&#39;</span><span class="p">,</span> <span class="nv">$_POST</span><span class="p">[</span><span class="s1">&#39;Called&#39;</span><span class="p">]);</span>
</span><span class='line'>  <span class="nb">header</span><span class="p">(</span><span class="s2">&quot;content-type: text/xml&quot;</span><span class="p">);</span>
</span><span class='line'>  <span class="k">echo</span> <span class="s2">&quot;&lt;?xml version=</span><span class="se">\&quot;</span><span class="s2">1.0</span><span class="se">\&quot;</span><span class="s2"> encoding=</span><span class="se">\&quot;</span><span class="s2">UTF-8</span><span class="se">\&quot;</span><span class="s2">?&gt;</span><span class="se">\n</span><span class="s2">&quot;</span><span class="p">;</span>
</span><span class='line'>  <span class="nb">ob_start</span><span class="p">();</span>
</span><span class='line'>  <span class="nb">var_dump</span><span class="p">(</span><span class="nv">$called</span><span class="p">);</span>
</span><span class='line'>  <span class="nb">var_dump</span><span class="p">(</span><span class="nv">$_POST</span><span class="p">);</span>
</span><span class='line'>  <span class="nv">$contents</span> <span class="o">=</span> <span class="nb">ob_get_contents</span><span class="p">();</span>
</span><span class='line'>  <span class="nb">ob_end_clean</span><span class="p">();</span>
</span><span class='line'>  <span class="nb">error_log</span><span class="p">(</span><span class="nv">$contents</span><span class="p">,</span> <span class="mi">3</span><span class="p">,</span> <span class="s2">&quot;/tmp/twilio.txt&quot;</span><span class="p">);</span>
</span><span class='line'><span class="cp">?&gt;</span><span class="x"></span>
</span><span class='line'><span class="x">&lt;Response&gt;</span>
</span><span class='line'><span class="x">  &lt;Dial timeout=&quot;10&quot; record=&quot;false&quot; callerId=&quot;YOURTWILIONUMBER&quot;&gt;</span><span class="cp">&lt;?</span><span class="o">=</span> <span class="nv">$called</span> <span class="cp">?&gt;</span><span class="x">&lt;/Dial&gt;</span>
</span><span class='line'><span class="x">&lt;/Response&gt;</span>
</span></code></pre></td></tr></table></div></figure>


<p>All we&#8217;re doing here is extracting the phone number from the Called header that Twilio sends us, stripping any leading 1&#8217;s, and then sending a TwiML response to dial that number. The ob_start through to the error_log is just logging the parameters if you&#8217;re interested.</p>


<p>Don&#8217;t forget to change the caller ID to your phone number, otherwise you get errors in the Twilio console.</p>


<p>So now when you place a call on your phone, Twilio will send the digits to the application which will return a Dial verb and the proper 10 digit number. Twilio links the two calls.</p>


<h2>Conclusions</h2>


<p></p></p>

<p>It took a bit of playing around to get this going but now I&#8217;ve shown that you don&#8217;t need an Asterisk server to integrate a SIP phone with Twilio. If you are setting up a phone bank or something with hard phones you can just configure them to hit Twilio, and for Twilio to hit them.</p>


<p>Of course, if you are expecting significant inbound traffic the benefit of a SIP proxy is that it can direct calls to multiple numbers without needing Twilio to be able to reach the phone directly. I&#8217;m hoping that Twilio can improve on that in the future!</p>

]]></content>
  </entry>
  
  <entry>
    <title type="html"><![CDATA[Find Method Definitions in Vim With Ctags]]></title>
    <link href="https://ertw.com/blog/2013/06/24/find-method-definitions-in-vim-with-ctags/"/>
    <updated>2013-06-24T07:39:28-05:00</updated>
    <id>https://ertw.com/blog/2013/06/24/find-method-definitions-in-vim-with-ctags</id>
    <content type="html"><![CDATA[<p>Ever asked yourself one of these questions?</p>


<ul>
<li>Where is the <strong>foo</strong> method defined in my code?</li>
<li>Where is the <strong>foo</strong> method defined in the Rails source?</li><br />
</ul>


<p></p></p>

<p>Then you spend a couple of minutes either grepping your source tree or looking on GitHub and then going back to your editor.</p>


<p>This weekend I went through <a href="https://learn.thoughtbot.com/products/2-vim-for-rails-developers">VIM for Rails developers</a>. There&#8217;s a lot that&#8217;s out of date, but there&#8217;s also some timeless stuff in there too. One thing I saw in there was the use of <a href="http://ctags.sourceforge.net/">ctags</a> which is a way of indexing code to help you find out where methods are defined.</p>


<p>Install the ctags package with brew/yum/apt/whatever. Then generate the tags with</p>


<p><strong>ctags -R &#8211;exclude=.git &#8211;exclude=log *</strong></p>


<p>You may want to add <strong>tags</strong> to your <strong>~/.gitignore</strong> because you don&#8217;t want to check this file in.</p>


<p>Also add <strong>set tags=./tags;</strong> to your <strong>.vimrc</strong> which tells vim to look for the tags in the current directory. If you have it in a parent directory, use <strong>set tags=./tags;/</strong> which tells vim to work backward until it&#8217;s found.</p>


<p>Then, put your cursor on a method and type <strong>control-]</strong> and you&#8217;ll jump to the definition. <strong>control-T</strong> or <strong>control-O</strong> will take you back to your code. <strong>control-W control-]</strong> opens it up in a horizontal split. <a href="http://stackoverflow.com/questions/563616/vim-and-ctags-tips-and-tricks">Stack Overflow</a> has some mappings you can use to reduce the number of keystrokes or use vertical splits.</p>


<p>If you use bundler and have it put the gems in your vendor directory, ctags will index those too. So you can look up Rails (or any gem) methods.</p>

]]></content>
  </entry>
  
  <entry>
    <title type="html"><![CDATA[Is It Hacked?]]></title>
    <link href="https://ertw.com/blog/2013/05/13/is-it-hacked/"/>
    <updated>2013-05-13T20:33:22-05:00</updated>
    <id>https://ertw.com/blog/2013/05/13/is-it-hacked</id>
    <content type="html"><![CDATA[<p>After coming across a few sites that were serving pharma spam to Google Bot but not regular browsers, I thought it would be fun to give Sinatra a try and come up with a quick web app that checks for cloaked links. That lead to a few more checks, then some improvements, and <a href="http://www.isithacked.com">Is it hacked?</a> was launched. I&#8217;ve got some ideas for where I want to go with the project, but in the meantime it&#8217;s catching stuff that other sites in the space are missing.</p>


<p>There&#8217;s also a bookmarklet at the bottom of the page. You can drag it to your button bar and check the site you&#8217;re on for any infection.</p>


<p>Update: I&rsquo;ve sold the site to someone else and am no longer involved.</p>
]]></content>
  </entry>
  
  <entry>
    <title type="html"><![CDATA[Understanding Capistrano Hooks and Deploy vs Deploy:migrations]]></title>
    <link href="https://ertw.com/blog/2013/03/13/understanding-capistrano-hooks-and-deploy-vs-deploy-migrations/"/>
    <updated>2013-03-13T07:26:01-05:00</updated>
    <id>https://ertw.com/blog/2013/03/13/understanding-capistrano-hooks-and-deploy-vs-deploy-migrations</id>
    <content type="html"><![CDATA[<p><a href="https://github.com/capistrano/capistrano">Capistrano</a> is a deployment framework for Rails, though it can be extended to do pretty much anything. The system comes with a bunch of built in tasks, and each task can be made up of other tasks and code. Plugins can add their own tasks and hook into default tasks, and the user can do the same through the configuration files.</p>


<p>Like any popular open source project capistrano has gone through changes. Documentation on the Internet is plentiful but often refers to old ways of doing things, so copy/pasting recipes can often result in stuff that doesn&#8217;t work quite right.</p>


<p>One common thing people need to do is to run some command after the deploy or at some time during the deploy. Capistrano has a very easy way of doing this.</p>


<figure class='code'><figcaption><span></span></figcaption><div class="highlight"><table><tr><td class="gutter"><pre class="line-numbers"><span class='line-number'>1</span>
</pre></td><td class='code'><pre><code class='Ruby'><span class='line'><span class="n">after</span> <span class="s1">&#39;deploy:update_code&#39;</span><span class="p">,</span> <span class="s1">&#39;deploy:symlink_shared&#39;</span>
</span></code></pre></td></tr></table></div></figure>


<p>This says &#8220;after running deploy:update_code, run deploy:symlink_shared&#8221;. The latter is custom task that&#8217;s defined elsewhere.</p>


<p>The problem comes in when you look at the way the &#8220;deploy&#8221; and &#8220;deploy:migrations&#8221; tasks differ. I&#8217;ve seen a common problem where something works when deploying without migrations but not when migrations are used. Usually this is because the hook used is not the right one, either because of bad information or the user figured out where to hook into by looking at the output of a deploy.</p>


<p>If you look at <a href="https://github.com/capistrano/capistrano/blob/master/lib/capistrano/recipes/deploy.rb">Capistrano&#8217;s default deploy.rb</a> you can piece together the tasks that are run in both cases.</p>


<figure class='code'><figcaption><span></span></figcaption><div class="highlight"><table><tr><td class="gutter"><pre class="line-numbers"><span class='line-number'>1</span>
<span class='line-number'>2</span>
<span class='line-number'>3</span>
<span class='line-number'>4</span>
<span class='line-number'>5</span>
<span class='line-number'>6</span>
<span class='line-number'>7</span>
<span class='line-number'>8</span>
<span class='line-number'>9</span>
<span class='line-number'>10</span>
<span class='line-number'>11</span>
<span class='line-number'>12</span>
<span class='line-number'>13</span>
<span class='line-number'>14</span>
</pre></td><td class='code'><pre><code class='Ruby'><span class='line'><span class="ss">deploy</span><span class="p">:</span><span class="n">migrations</span>
</span><span class='line'>  <span class="n">update_code</span>
</span><span class='line'>   <span class="n">strategy</span><span class="o">.</span><span class="n">deploy!</span>
</span><span class='line'>   <span class="n">finalize_update</span>
</span><span class='line'>  <span class="n">migrate</span>
</span><span class='line'>  <span class="n">create_symlink</span>
</span><span class='line'>  <span class="n">restart</span>
</span><span class='line'><span class="n">deploy</span>
</span><span class='line'>  <span class="n">update</span>
</span><span class='line'>    <span class="n">update_code</span>
</span><span class='line'>      <span class="n">strategy</span><span class="o">.</span><span class="n">deploy!</span>
</span><span class='line'>      <span class="n">finalize_update</span>
</span><span class='line'>    <span class="n">create_symlink</span>
</span><span class='line'>  <span class="n">restart</span>
</span></code></pre></td></tr></table></div></figure>


<p>From this, you can see that the sequence is somewhat different. The &#8220;update&#8221; task isn&#8217;t used in the migrations case. Instead, the components are replicated.</p>


<p>If you want to hook in, use</p>


<ul>
<li><b>update_code</b> to run before/after the code is put into the release directory, such as if you want to make more symlinks or do something before migrations are potentially run.</li>
<li><b>create_symlink</b> to run before/after the symbolic link pointing to the current release is made. Note that <b>symlink</b> is deprecated. You can run it from the command line, but if you try and hook in to it, you won&#8217;t be happy.</li>
<li><b>restart</b> to run before/after the application server is restarted, e.g. to restart background workers or do deployment notifications</li><br />
</ul>


<p></p></p>
]]></content>
  </entry>
  
  <entry>
    <title type="html"><![CDATA[BASH History Expansion]]></title>
    <link href="https://ertw.com/blog/2013/01/24/bash-history-expansion/"/>
    <updated>2013-01-24T14:22:28-06:00</updated>
    <id>https://ertw.com/blog/2013/01/24/bash-history-expansion</id>
    <content type="html"><![CDATA[<p>The Unix shell has a whole bunch of features to make your life easier. One has to do with the history. Some I have managed to ingrain into muscle memory, others I have to remember which often means I do it the long way. I hope these examples help you out.</p>

<figure class='code'><figcaption><span></span></figcaption><div class="highlight"><table><tr><td class="gutter"><pre class="line-numbers"><span class='line-number'>1</span>
<span class='line-number'>2</span>
<span class='line-number'>3</span>
<span class='line-number'>4</span>
<span class='line-number'>5</span>
<span class='line-number'>6</span>
<span class='line-number'>7</span>
<span class='line-number'>8</span>
<span class='line-number'>9</span>
<span class='line-number'>10</span>
<span class='line-number'>11</span>
<span class='line-number'>12</span>
<span class='line-number'>13</span>
<span class='line-number'>14</span>
<span class='line-number'>15</span>
<span class='line-number'>16</span>
<span class='line-number'>17</span>
<span class='line-number'>18</span>
<span class='line-number'>19</span>
<span class='line-number'>20</span>
<span class='line-number'>21</span>
<span class='line-number'>22</span>
<span class='line-number'>23</span>
<span class='line-number'>24</span>
<span class='line-number'>25</span>
<span class='line-number'>26</span>
<span class='line-number'>27</span>
<span class='line-number'>28</span>
<span class='line-number'>29</span>
<span class='line-number'>30</span>
</pre></td><td class='code'><pre><code class='Bash'><span class='line'><span class="c"># Start off with some files</span>
</span><span class='line'><span class="nv">$ </span>touch one two three four
</span><span class='line'><span class="c"># !$ expands to all the arguments from the last command</span>
</span><span class='line'><span class="nv">$ </span>ls !*
</span><span class='line'>ls one two three four
</span><span class='line'>four  one three   two
</span><span class='line'><span class="c"># !foo runs the last command that starts with foo</span>
</span><span class='line'><span class="nv">$ </span>!touch
</span><span class='line'>touch one two three four
</span><span class='line'><span class="c"># Carat (^) does a search/replace in the previous command</span>
</span><span class='line'><span class="nv">$ </span>^touch^ls
</span><span class='line'>ls one two three four
</span><span class='line'>four  one three   two
</span><span class='line'><span class="c"># !$ is the last item in the previous command, !^ is the first _argument_</span>
</span><span class='line'><span class="nv">$ </span>head !<span class="err">$</span>
</span><span class='line'>head four
</span><span class='line'><span class="nv">$ </span>ls four three two one
</span><span class='line'>four  one three   two
</span><span class='line'><span class="nv">$ </span>cat !^
</span><span class='line'>cat four
</span><span class='line'><span class="c"># !:n is the n&#39;th item on the previous command line, 0 indexed</span>
</span><span class='line'><span class="nv">$ </span>ls four three two one
</span><span class='line'>four  one three   two
</span><span class='line'><span class="nv">$ </span>cat !:3
</span><span class='line'>cat two
</span><span class='line'><span class="nv">$ </span>ls four three two one
</span><span class='line'>four  one three   two
</span><span class='line'><span class="nv">$ </span>which !:0
</span><span class='line'>which ls
</span><span class='line'>/bin/ls
</span></code></pre></td></tr></table></div></figure>


<p>There are a lot more, run a man bash and look for the section called HISTORY EXPANSION.</p>
]]></content>
  </entry>
  
  <entry>
    <title type="html"><![CDATA[Mixpanel Track_links and Track_forms]]></title>
    <link href="https://ertw.com/blog/2013/01/05/mixpanel-track_links-and-track_forms/"/>
    <updated>2013-01-05T13:39:08-06:00</updated>
    <id>https://ertw.com/blog/2013/01/05/mixpanel-track_links-and-track_forms</id>
    <content type="html"><![CDATA[<p>I&#8217;ve long been a fan of <a href="http://mixpanel.com">MixPanel</a> and was happy that I got to get to use them again over at <a href="https://www.waveapps.com/payroll/">Wave Payroll</a>. Last time I used them you could only track a page view, but now they have added <i>track_links</i> and <i>track_forms</i> which fire the event asynchronously after the link is clicked or the form is submitted.</p>


<p>I started off by using the <a href="https://github.com/mobalean/event_tracker">event_tracker</a> gem which only handles the page view events, but it does make it easier to fire events in the view based on controller actions so it is well worth using. I talked to the author about adding support for track_links and track_forms, but after a good discussion he convinced me that the gem was not the right place for this and that I should pursue something more elegant such as tagging the links.</p>


<p>Ideally, what we wanted to arrive at was something like</p>


<figure class='code'><figcaption><span></span></figcaption><div class="highlight"><table><tr><td class="gutter"><pre class="line-numbers"><span class='line-number'>1</span>
</pre></td><td class='code'><pre><code class='HTML'><span class='line'><span class="nt">&lt;a</span> <span class="na">href=</span><span class="s">&quot;blah&quot;</span> <span class="na">class=</span><span class="s">&quot;track-with-mixpanel&quot;</span> <span class="na">data-event=</span><span class="s">&quot;clicked on login&quot;</span><span class="nt">&gt;</span>
</span></code></pre></td></tr></table></div></figure>


<p>or with Rails helpers:</p>


<figure class='code'><figcaption><span></span></figcaption><div class="highlight"><table><tr><td class="gutter"><pre class="line-numbers"><span class='line-number'>1</span>
</pre></td><td class='code'><pre><code class='Ruby'><span class='line'><span class="o">=</span><span class="n">link_to</span> <span class="n">login_path</span><span class="p">,</span> <span class="ss">:class</span> <span class="o">=&gt;</span> <span class="s2">&quot;track-with-mixpanel&quot;</span><span class="p">,</span> <span class="ss">:data</span> <span class="o">=&gt;</span> <span class="p">{</span> <span class="ss">:event</span> <span class="o">=&gt;</span> <span class="s2">&quot;clicked on login&quot;</span> <span class="p">}</span>
</span></code></pre></td></tr></table></div></figure>


<p>which would magically call</p>


<figure class='code'><figcaption><span></span></figcaption><div class="highlight"><table><tr><td class="gutter"><pre class="line-numbers"><span class='line-number'>1</span>
</pre></td><td class='code'><pre><code class='Ruby'><span class='line'><span class="n">mixpanel</span><span class="o">.</span><span class="n">track_links</span><span class="p">(</span><span class="s2">&quot;#id_of_element&quot;</span><span class="p">,</span> <span class="s2">&quot;clicked on login&quot;</span><span class="p">)</span>
</span></code></pre></td></tr></table></div></figure>


<p>One problem is that not all the elements had IDs and I didn&#8217;t want the added friction of having to add that in.</p>


<p>What I came up with was:</p>


<figure class='code'><figcaption><span></span></figcaption><div class="highlight"><table><tr><td class="gutter"><pre class="line-numbers"><span class='line-number'>1</span>
<span class='line-number'>2</span>
<span class='line-number'>3</span>
<span class='line-number'>4</span>
<span class='line-number'>5</span>
<span class='line-number'>6</span>
<span class='line-number'>7</span>
<span class='line-number'>8</span>
<span class='line-number'>9</span>
<span class='line-number'>10</span>
<span class='line-number'>11</span>
<span class='line-number'>12</span>
</pre></td><td class='code'><pre><code class='Javascript'><span class='line'><span class="nx">$</span><span class="p">(</span><span class="s2">&quot;.track-with-mixpanel&quot;</span><span class="p">).</span><span class="nx">each</span><span class="p">(</span> <span class="kd">function</span><span class="p">(</span><span class="nx">i</span><span class="p">)</span> <span class="p">{</span>
</span><span class='line'>  <span class="kd">var</span> <span class="nx">obj</span> <span class="o">=</span> <span class="nx">$</span><span class="p">(</span><span class="k">this</span><span class="p">);</span>
</span><span class='line'>  <span class="c1">// Make up an ID if there is none</span>
</span><span class='line'>  <span class="k">if</span> <span class="p">(</span><span class="o">!</span><span class="nx">obj</span><span class="p">.</span><span class="nx">attr</span><span class="p">(</span><span class="s1">&#39;id&#39;</span><span class="p">))</span> <span class="p">{</span>
</span><span class='line'>    <span class="nx">obj</span><span class="p">.</span><span class="nx">attr</span><span class="p">(</span><span class="s1">&#39;id&#39;</span><span class="p">,</span> <span class="s2">&quot;mixpanel&quot;</span> <span class="o">+</span> <span class="nb">Math</span><span class="p">.</span><span class="nx">floor</span><span class="p">(</span><span class="nb">Math</span><span class="p">.</span><span class="nx">random</span><span class="p">()</span> <span class="o">*</span> <span class="mi">4294967296</span><span class="p">));</span>
</span><span class='line'>  <span class="p">}</span>
</span><span class='line'>  <span class="k">if</span> <span class="p">(</span><span class="nx">obj</span><span class="p">.</span><span class="nx">is</span><span class="p">(</span><span class="s2">&quot;form&quot;</span><span class="p">))</span> <span class="p">{</span>
</span><span class='line'>    <span class="nx">mixpanel</span><span class="p">.</span><span class="nx">track_forms</span><span class="p">(</span><span class="s2">&quot;#&quot;</span> <span class="o">+</span> <span class="nx">obj</span><span class="p">.</span><span class="nx">attr</span><span class="p">(</span><span class="s2">&quot;id&quot;</span><span class="p">),</span> <span class="nx">obj</span><span class="p">.</span><span class="nx">data</span><span class="p">(</span><span class="s1">&#39;event&#39;</span><span class="p">),</span> <span class="nx">obj</span><span class="p">.</span><span class="nx">data</span><span class="p">(</span><span class="s1">&#39;properties&#39;</span><span class="p">));</span>
</span><span class='line'>  <span class="p">}</span> <span class="k">else</span> <span class="p">{</span>
</span><span class='line'>    <span class="nx">mixpanel</span><span class="p">.</span><span class="nx">track_links</span><span class="p">(</span><span class="s2">&quot;#&quot;</span> <span class="o">+</span> <span class="nx">obj</span><span class="p">.</span><span class="nx">attr</span><span class="p">(</span><span class="s2">&quot;id&quot;</span><span class="p">),</span> <span class="nx">obj</span><span class="p">.</span><span class="nx">data</span><span class="p">(</span><span class="s1">&#39;event&#39;</span><span class="p">),</span> <span class="nx">obj</span><span class="p">.</span><span class="nx">data</span><span class="p">(</span><span class="s1">&#39;properties&#39;</span><span class="p">));</span>
</span><span class='line'>  <span class="p">}</span>
</span><span class='line'><span class="p">});</span>
</span></code></pre></td></tr></table></div></figure>


<p>So this simply finds all the links with the <i>track-with-mixpanel</i> class, assigns them a random ID if they don&#8217;t have one, and then calls the appropriate mixpanel function on them. </p>


<p>A couple of notes, though&#8230;</p>


<p>The first is that the data-properties doesn&#8217;t quite work right. Pulling the data into a hash requires some finesse that I haven&#8217;t been able to figure out.</p>


<p>The second is that <i>track_links</i> and <i>track_forms</i> are horribly broken and will mess up any onClick handlers you have. So if you have links that you use <i>:method => :post</i> for, some third party javascript like validations or Stripe, you&#8217;re better off with the old <i>track</i> method because Mixpanel won&#8217;t play nicely with it. But for regular links and forms, this is great.</p>

]]></content>
  </entry>
  
  <entry>
    <title type="html"><![CDATA[JIRA Shortcuts With Quicksilver]]></title>
    <link href="https://ertw.com/blog/2012/11/16/jira-shortcuts-with-quicksilver/"/>
    <updated>2012-11-16T09:12:31-06:00</updated>
    <id>https://ertw.com/blog/2012/11/16/jira-shortcuts-with-quicksilver</id>
    <content type="html"><![CDATA[<p>One of my favourite applications on my Mac is <a href="http://qsapp.com/">Quicksilver</a>. It&#8217;s an application launcher that can be extended to do almost anything. I&#8217;ve been able to set up hot keys to rate songs in iTunes, and also set shortcuts to URLs.</p>


<p>These screenshots explain how to make a &#8220;jira&#8221; shortcut that will take you to a particular issue in JIRA. The instructions will work equally well for anything where the URL is well known. For example, ticket PR-139 is at https://mycompany.atlassian.net/browse/pr-139. To go there, you&#8217;ll hit your Quicksilver hot key (e.g. Control-space), then type &#8220;jira&#8221;, enter, then the ticket number, and enter.</p>


<p>First, make sure the <strong>Web Search Module</strong> plugin is loaded by checking the box in the plugins menu. </p>


<p><a href="https://ertw.com/blog/blog/wp-content/uploads/2012/11/Plugins.jpg"><img src="https://ertw.com/blog/blog/wp-content/uploads/2012/11/Plugins-300x207.jpg" alt="" title="Plugins" width="300" height="207" class="alignnone size-medium wp-image-463" /></a></p>


<p>Then, add the shortcut to your catalog by adding it as a custom source under <strong>Web Search List</strong>. </p>


<p><a href="https://ertw.com/blog/blog/wp-content/uploads/2012/11/Catalog-1.jpg"><img src="https://ertw.com/blog/blog/wp-content/uploads/2012/11/Catalog-1-300x146.jpg" alt="" title="Catalog-1" width="300" height="146" class="alignnone size-medium wp-image-464" /></a></p>


<p>Looking more closely at what you add:</p>


<p><a href="https://ertw.com/blog/blog/wp-content/uploads/2012/11/Quicksilver.jpg"><img src="https://ertw.com/blog/blog/wp-content/uploads/2012/11/Quicksilver.jpg" alt="" title="Quicksilver" width="271" height="52" class="alignnone size-full wp-image-465" /></a></p>


<p>The <strong>name</strong> is whatever you want to type when first opening Quicksilver. The <strong>url</strong> is the URL you want to go to, with the dynamic part replaced by <strong>***</strong>.</p>


<p>You may have to rescan the catalog from the main Quicksilver menu.</p>

]]></content>
  </entry>
  
  <entry>
    <title type="html"><![CDATA[Podcast - Linux Admin Show]]></title>
    <link href="https://ertw.com/blog/2012/09/23/podcast-linux-admin-show/"/>
    <updated>2012-09-23T07:40:49-05:00</updated>
    <id>https://ertw.com/blog/2012/09/23/podcast-linux-admin-show</id>
    <content type="html"><![CDATA[<p>I just wanted to mention that I&#8217;ve started a podcast over at <a href="http://linuxadminshow.com">LinuxAdminShow.com</a>. It&#8217;s me talking to a guest every week about issues that matter to the Linux administrator. The first episode was about systems management and admins-who-code, the second was about SSL.</p>


<p>Always looking for feedback and guest/topic suggestions. Have a listen and let me know what you think!</p>

]]></content>
  </entry>
  
  <entry>
    <title type="html"><![CDATA[Deploying Rails Review]]></title>
    <link href="https://ertw.com/blog/2012/08/14/deploying-rails-review/"/>
    <updated>2012-08-14T09:09:40-05:00</updated>
    <id>https://ertw.com/blog/2012/08/14/deploying-rails-review</id>
    <content type="html"><![CDATA[<p><a href="http://www.amazon.com/exec/obidos/ASIN/1934356956/ertw-20">Deploying Rails</a><br />
Automate, Deploy, Scale, Maintain, and Sleep at Night<br />
Anthony Burns and Tom Copeland<br />
<a href="http://www.amazon.com/exec/obidos/ASIN/1934356956/ertw-20"><img style="float:right" src="http://ecx.images-amazon.com/images/I/41jmvpDX24L._SL500_AA300_.jpg" alt="Deploying Rails" /></a></p>


<p>&#8220;Deploying Rails&#8221; is more than just about deploying a Rails application, it&#8217;s about that and everything that goes into managing servers, from provisioning to monitoring. This book explains how to do these tasks with the help of some popular Open Source tools and a focus on automation.</p>


<p>The flow of the book is fairly logical. Start by building virtual machines with Vagrant. Learn how to automate configuration with Puppet. Nail down deployment and remote tasks with Capistrano. Monitor the server and application with Nagios and Ganglia. Delve into some side topics like systems administration. Even though there is ample free documentation on all of these topics, this book sets itself apart in two ways.</p>


<p>First is that the tools from previous chapters are used to augment later chapters. You&#8217;ll learn how to use Vagrant to set up a virtual machine in the first chapter, and from them on when you need a server you&#8217;ll configure a Vagrant box. You&#8217;ll learn how to automate configuration management with Puppet in the second chapter, and all successive chapters build on that. You don&#8217;t simply install Nagios, you write Puppet scripts that install Nagios for you. By the end of the book you have a collection of tools that you can start using in your own real world environment.</p>


<p>Secondly, you&#8217;re doing everything on an environment you can build yourself without needing to know how to install Linux, owning spare servers, or knowing how to manage servers. You just install Vagrant and follow the book. The book is heavy on code samples and screen captures &#8211; it is the exception to open up to a random page and not see some code or example. You can have a replicated MySQL setup and work on your database recovery practices, destroy it, and know you can rebuild it with a few keystrokes.</p>


<p>Puppet is a large part of this book. Almost every task is done in a Puppet manifest, from installing the web server to setting up monitoring. The authors walk you through creating couple of simple manifests and then refactoring the code to be more reusable. The basics of Puppet are covered such as installing packages, starting services, and copying files. Later on Puppet is used to interact with the existing system by managing cron jobs and using templates to edit existing configuration files.</p>


<p>The popular deployment suite, Capistrano, is the topic of two chapters. The first looks at a simple deployment, then goes on to examine roles and adding hooks that automate tasks at points during the deployment. The advanced chapter delves into remote command invocation and parsing, multistage deployments (such as a separate staging and production deployment) and further automation of the deployment. People who have used Capistrano before will not be surprised by much in the basic chapter, but are almost certain to find something helpful in the advanced chapter. It opened my eyes to what Capistrano can do outside of the deployment &#8211; it can automate maintenance and support tasks, too.</p>


<p>The last three chapters discuss various topics, from managing multiple Ruby interpreters with RVM to backing up your database and how to manage a master-slave setup. Some of these topics can be books in themselves, though Deploying Rails does a good job at getting you started. Even though the examples throughout the book use Apache and Phusion Passenger, the appendixes have a chapter on using Nginx and Unicorn.</p>


<p>Despite all the remarkable content, I did feel there were some areas that could have been covered. Given the extensive use of Vagrant throughout the book I found it surprising there was no discussion about using it for its intended purpose of managing developer&#8217;s environments. There&#8217;s a brief mention that Vagrant can run the Puppet scripts and you can save the step of running it manually, but other than that I found little that would tell the reader that they could reuse the work they had been doing so that all the developers would have a production like environment in which to work. Similarily, since the environment is well defined the authors were able to make several assumptions in their coniguration that would not necessarily work in a typical production environment. Some of these are simple, such as IP addresses and SSH keys being hard coded, but some are more involved, such as how to distribute the Puppet manifests when that&#8217;s not taken care of by Vagrant. Books, like software, have to draw the line somewhere though.</p>


<p>As a systems administrator turned developer I was encouraged to see this book being released. It shows the ideal marriage of the systems administration mindset, with its relentless focus on automation and monitoring, with the tools available to the modern programmer. In some circles this practice is called DevOps, but even in shops that keep these two separate, this book will benefit both teams.</p>

]]></content>
  </entry>
  
  <entry>
    <title type="html"><![CDATA[Controlling HipChat Status Through AppleScript]]></title>
    <link href="https://ertw.com/blog/2012/05/02/controlling-hipchat-status-through-applescript/"/>
    <updated>2012-05-02T14:47:25-05:00</updated>
    <id>https://ertw.com/blog/2012/05/02/controlling-hipchat-status-through-applescript</id>
    <content type="html"><![CDATA[<p>At my awesome <a href="http://waveaccounting.com">job</a> we use <a href="http://hipchat.com/r/2zvuo">HipChat</a> for team collaboration. I also use the <a href="http://itunes.apple.com/us/app/pomodoro/id417574133?mt=12">Pomodoro app</a> to try and manage my time. One problem is that I often get interrupted while working. </p>


<p>Long story short, the Pomodoro app lets you run AppleScript when various events happen, so I wrote some stuff to change my HipChat status to DND when I&#8217;m in the middle of a work cycle. Here&#8217;s the code:</p>


<pre><code class="Applescript">tell application "System Events" to tell UI element "HipChat" of list 1 of process "Dock"
    perform action "AXShowMenu"
    delay 0.5
    click menu item "Status" of menu 1
    click menu item "DND" of menu 1 of menu item "Status" of menu 1
 end tell
</code></pre>

<p>All that remains is to insert that into the Pomodoro app through Preferences -> Scripts:</p>


<p><a href="https://ertw.com/blog/blog/wp-content/uploads/2012/05/Screen-Shot-2012-05-02-at-3.45.33-PM.png"><img src="https://ertw.com/blog/blog/wp-content/uploads/2012/05/Screen-Shot-2012-05-02-at-3.45.33-PM.png" alt="" title="Pomodoro scripts" width="661" height="573" class="alignnone size-full wp-image-430" /></a></p>


<p>Just note that you have to change &#8220;DND&#8221; to &#8220;Available&#8221; for some of the events.</p>


<p>This was my first foray into AppleScript, so it&#8217;s possible I&#8217;m sending my banking details off to Nigeria, but it seems to work so far.</p>


<p><b>Edit</b> you need to enable access for assistive devices from System Preferences -> Universal Access:</p>


<p><a href="https://ertw.com/blog/blog/wp-content/uploads/2012/05/universal_access.jpg"><img src="https://ertw.com/blog/blog/wp-content/uploads/2012/05/universal_access.jpg" alt="" title="universal_access" width="666" height="578" class="alignnone size-full wp-image-435" /></a></p>

]]></content>
  </entry>
  
  <entry>
    <title type="html"><![CDATA[Making New Relic Awesome]]></title>
    <link href="https://ertw.com/blog/2012/01/21/making-new-relic-awesome/"/>
    <updated>2012-01-21T11:39:41-06:00</updated>
    <id>https://ertw.com/blog/2012/01/21/making-new-relic-awesome</id>
    <content type="html"><![CDATA[<p><b>Update</b> - if you sign up through <a href='http://newrelic.extole.com/a/clk/5RMk1n'>this link</a>, New Relic will send you $25 gift card for trying it out.</p>


<p>Like many Rails people, I use <a href="http://newrelic.extole.com/a/clk/5RMk1n">New Relic</a> to monitor my Rails app. At <a href="http://waveaccounting.com">Wave Accounting</a> we even pay for it. It&#8217;s well worth the money, as you get a lot of extra visibility into your app.</p>


<p>At the standard level, New Relic is pretty good, but sometimes it seems like I&#8217;m missing out on something. RPM will show me that a controller is running slowly but most of the time is spent in the controller itself, not really saying what&#8217;s happening. I&#8217;ve recently discovered a few tweaks that have made a huge difference.</p>


<h2>Turn on garbage collection</h2>


<p></p></p>

<p>It&#8217;s pretty embarrassing, but this isn&#8217;t on by default. It&#8217;s so simple to figure out how much of your time is spent in GC, the only caveat is that you have to be running REE or 1.9.x. <a href="http://newrelic.com/docs/ruby/ruby-gc-instrumentation">This doc</a> explains how, but all you have to do is turn on the stats and New Relic does the rest.</p>


<figure class='code'><figcaption><span></span></figcaption><div class="highlight"><table><tr><td class="gutter"><pre class="line-numbers"><span class='line-number'>1</span>
<span class='line-number'>2</span>
<span class='line-number'>3</span>
<span class='line-number'>4</span>
</pre></td><td class='code'><pre><code class='Ruby'><span class='line'><span class="c1"># For REE</span>
</span><span class='line'><span class="no">GC</span><span class="o">.</span><span class="n">enable_stats</span>
</span><span class='line'><span class="c1"># For 1.9.2</span>
</span><span class='line'><span class="c1"># GC::Profiler.enable</span>
</span></code></pre></td></tr></table></div></figure>


<p>Put that in an initializer, and you get GC activity in almost all your graphs:</p>


<p><img src="https://ertw.com/blog/blog/wp-content/uploads/2012/01/Screen-Shot-2012-01-21-at-11.16.33-AM.png" alt="" title="Graphing Ruby GC activity in New Relic" width="816" height="102" class="alignnone size-full wp-image-413" /></p>


<h2>Local development mode</h2>


<p></p></p>

<p>If you go to http://localhost:3000/newrelic you will get some in depth information about what&#8217;s going on in your app when in dev mode. If you&#8217;re using <a href="http://pow.cx">pow</a> then add the following to ~/.powconfig:</p>


<pre><code>export NEWRELIC_DISPATCHER=pow<br />
export POW_WORKERS=1</code></pre>


<p></p></p>

<p>There&#8217;s a wealth of information here.</p>


<h2>Trace specific sections of your code</h2>


<p></p></p>

<p>Your controller does a bunch of stuff but New Relic reports it as one big block. <a href="http://newrelic.com/docs/docs/custom-metric-collection">block tracing to the rescue</a>!</p>


<figure class='code'><figcaption><span></span></figcaption><div class="highlight"><table><tr><td class="gutter"><pre class="line-numbers"><span class='line-number'>1</span>
<span class='line-number'>2</span>
<span class='line-number'>3</span>
<span class='line-number'>4</span>
<span class='line-number'>5</span>
<span class='line-number'>6</span>
<span class='line-number'>7</span>
<span class='line-number'>8</span>
<span class='line-number'>9</span>
<span class='line-number'>10</span>
<span class='line-number'>11</span>
<span class='line-number'>12</span>
</pre></td><td class='code'><pre><code class='Ruby'><span class='line'><span class="n">respond_to</span> <span class="k">do</span> <span class="o">|</span><span class="nb">format</span><span class="o">|</span>
</span><span class='line'>  <span class="nb">format</span><span class="o">.</span><span class="n">html</span> <span class="k">do</span>
</span><span class='line'>    <span class="nb">self</span><span class="o">.</span><span class="n">class</span><span class="o">.</span><span class="n">trace_execution_scoped</span><span class="p">(</span><span class="o">[</span><span class="s1">&#39;Custom/MyController#show/render_html&#39;</span><span class="o">]</span><span class="p">)</span> <span class="k">do</span>
</span><span class='line'>      <span class="n">do_it_in_html</span>
</span><span class='line'>    <span class="k">end</span>
</span><span class='line'>  <span class="k">end</span>
</span><span class='line'>  <span class="nb">format</span><span class="o">.</span><span class="n">pdf</span> <span class="k">do</span>
</span><span class='line'>    <span class="nb">self</span><span class="o">.</span><span class="n">class</span><span class="o">.</span><span class="n">trace_execution_scoped</span><span class="p">(</span><span class="o">[</span><span class="s1">&#39;Custom/MyController#show/render_pdf&#39;</span><span class="o">]</span><span class="p">)</span> <span class="k">do</span>
</span><span class='line'>      <span class="n">do_it_in_pdf</span>
</span><span class='line'>    <span class="k">end</span>
</span><span class='line'>  <span class="k">end</span>
</span><span class='line'><span class="k">end</span>
</span></code></pre></td></tr></table></div></figure>


<p>Then, these blocks will be counted separately.</p>


<h2>Trace methods in your code, or other people&#8217;s code</h2>


<p></p></p>

<p>Want to do the same thing as before on someone else&#8217;s code, or at a method level? Add a method tracer in your initializer:</p>


<figure class='code'><figcaption><span></span></figcaption><div class="highlight"><table><tr><td class="gutter"><pre class="line-numbers"><span class='line-number'>1</span>
<span class='line-number'>2</span>
<span class='line-number'>3</span>
<span class='line-number'>4</span>
<span class='line-number'>5</span>
<span class='line-number'>6</span>
<span class='line-number'>7</span>
</pre></td><td class='code'><pre><code class='Ruby'><span class='line'><span class="nb">require</span> <span class="s1">&#39;new_relic/agent/method_tracer&#39;</span>
</span><span class='line'><span class="no">CalculationEngine</span><span class="o">.</span><span class="n">class_eval</span> <span class="k">do</span>
</span><span class='line'>    <span class="kp">include</span> <span class="no">NewRelic</span><span class="o">::</span><span class="no">Agent</span><span class="o">::</span><span class="no">MethodTracer</span>
</span><span class='line'>    <span class="n">add_method_tracer</span> <span class="ss">:calculate_taxes</span>
</span><span class='line'>    <span class="n">add_method_tracer</span> <span class="ss">:calculate_totals</span>
</span><span class='line'>    <span class="n">add_method_tracer</span> <span class="ss">:send_invoice</span>
</span><span class='line'><span class="k">end</span>
</span></code></pre></td></tr></table></div></figure>


<p>Poof, all those are now traced and broken out separately:</p>


<p><img src="https://ertw.com/blog/blog/wp-content/uploads/2012/01/Screen-Shot-2012-01-21-at-11.35.29-AM.png" alt="" title="Extra info in new relic" width="803" height="38" class="alignnone size-full wp-image-415" /></p>


<h2>Other things</h2>


<p></p></p>

<p>You can also trace custom metrics, such as user signups or report views. I&#8217;m still working on that, along with monitoring background jobs.</p>

]]></content>
  </entry>
  
  <entry>
    <title type="html"><![CDATA[Twilio Client Quickstart - in Ruby]]></title>
    <link href="https://ertw.com/blog/2011/10/25/twilio-client-quickstart-in-ruby/"/>
    <updated>2011-10-25T21:38:47-05:00</updated>
    <id>https://ertw.com/blog/2011/10/25/twilio-client-quickstart-in-ruby</id>
    <content type="html"><![CDATA[<p>I&#8217;ve wanted to play with the Twilio client for a while. They have this great <a href="http://www.twilio.com/docs/quickstart/client/">quick start</a> but it&#8217;s written in PHP. Now I don&#8217;t mind PHP, but I prefer Ruby. If I&#8217;m going to write anything <i>using</i> the client, it&#8217;s going to be in Ruby, so I don&#8217;t see the point in learning it on PHP.</p>


<p></p></p>

<p>So, here is the meat of the quickstart done up as a Rails 3.1 application.</p>


<p></p></p>

<p>First, generate the application.</p>


<p></p></p>

<figure class='code'><figcaption><span></span></figcaption><div class="highlight"><table><tr><td class="gutter"><pre class="line-numbers"><span class='line-number'>1</span>
<span class='line-number'>2</span>
<span class='line-number'>3</span>
<span class='line-number'>4</span>
<span class='line-number'>5</span>
<span class='line-number'>6</span>
<span class='line-number'>7</span>
<span class='line-number'>8</span>
<span class='line-number'>9</span>
</pre></td><td class='code'><pre><code class='Bash'><span class='line'><span class="nv">$ </span>rails new twilio
</span><span class='line'>      create
</span><span class='line'>      create  README
</span><span class='line'>      create  Rakefile
</span><span class='line'>      create  config.ru
</span><span class='line'>      create  .gitignore
</span><span class='line'>      create  Gemfile
</span><span class='line'>      create  app
</span><span class='line'>      ...
</span></code></pre></td></tr></table></div></figure>


<p>This creates a new Rails 3.1 app in the current directory called <b>twilio</b>. Change to this directory, and add a line to your <b>Gemfile</b>:</p>


<p></p></p>

<figure class='code'><figcaption><span>Gemfile</span></figcaption><div class="highlight"><table><tr><td class="gutter"><pre class="line-numbers"><span class='line-number'>1</span>
</pre></td><td class='code'><pre><code class='Ruby'><span class='line'><span class="n">gem</span> <span class="s1">&#39;twilio-ruby&#39;</span>
</span></code></pre></td></tr></table></div></figure>


<p>Run <b>bundle install</b> to add the official Twilio gem to your bundle.</p>


<p></p></p>

<p>Next, head on over to your Twilio account and get your SID and auth token. Those can go in an initializer, <b>config/initializers/twilio.rb</b>:</p>


<p></p></p>

<figure class='code'><figcaption><span>config/initializers/twilio.rb</span></figcaption><div class="highlight"><table><tr><td class="gutter"><pre class="line-numbers"><span class='line-number'>1</span>
<span class='line-number'>2</span>
</pre></td><td class='code'><pre><code class='Ruby'><span class='line'><span class="no">TwilioAccountSID</span><span class="o">=</span><span class="s2">&quot;AC........&quot;</span>
</span><span class='line'><span class="no">TwilioAuthToken</span><span class="o">=</span><span class="s2">&quot;.......&quot;</span>
</span></code></pre></td></tr></table></div></figure>


<p>Those are the magic tokens that let you authenticate yourself to the Twilio API, and more importantly for them, let them bill you.</p>


<p></p></p>

<p>Next, head on over to <b>app/helpers/application_helper.rb</b>:</p>


<p></p></p>

<figure class='code'><figcaption><span>app/helpers/application_helper.rb</span></figcaption><div class="highlight"><table><tr><td class="gutter"><pre class="line-numbers"><span class='line-number'>1</span>
<span class='line-number'>2</span>
<span class='line-number'>3</span>
<span class='line-number'>4</span>
<span class='line-number'>5</span>
</pre></td><td class='code'><pre><code class='Ruby'><span class='line'><span class="k">module</span> <span class="nn">ApplicationHelper</span>
</span><span class='line'>  <span class="k">def</span> <span class="nf">twilio_javascript_include_tag</span>
</span><span class='line'>    <span class="n">javascript_include_tag</span> <span class="s2">&quot;http://static.twilio.com/libs/twiliojs/1.0/twilio.min.js&quot;</span>
</span><span class='line'>  <span class="k">end</span>
</span><span class='line'><span class="k">end</span>
</span></code></pre></td></tr></table></div></figure>


<p>Then in <b>app/views/layouts/application.html.erb</b> add that helper in the head:</p>


<p></p></p>

<figure class='code'><figcaption><span>app/views/layouts/application.html.erb</span></figcaption><div class="highlight"><table><tr><td class="gutter"><pre class="line-numbers"><span class='line-number'>1</span>
<span class='line-number'>2</span>
<span class='line-number'>3</span>
<span class='line-number'>4</span>
<span class='line-number'>5</span>
</pre></td><td class='code'><pre><code class='Ruby'><span class='line'><span class="o">&lt;</span><span class="n">pre</span><span class="o">&gt;&lt;</span><span class="n">code</span><span class="o">&gt;</span>
</span><span class='line'>  <span class="o">&lt;</span><span class="sx">%= stylesheet_link_tag    &quot;application&quot; %&gt;</span>
</span><span class='line'><span class="sx">  &lt;%=</span> <span class="n">javascript_include_tag</span> <span class="s2">&quot;application&quot;</span> <span class="sx">%&gt;</span>
</span><span class='line'><span class="sx">  &lt;%= twilio_javascript_include_tag  %&gt;</span>
</span><span class='line'>  <span class="o">&lt;%=</span> <span class="n">csrf_meta_tags</span> <span class="sx">%&gt;&lt;br /&gt;</span>
</span></code></pre></td></tr></table></div></figure>


<p>Yea, you could have put the code right in the layout, but I like sparse layout files.</p>


<p></p></p>

<p>Next up, create a controller:</p>


<figure class='code'><figcaption><span></span></figcaption><div class="highlight"><table><tr><td class="gutter"><pre class="line-numbers"><span class='line-number'>1</span>
<span class='line-number'>2</span>
<span class='line-number'>3</span>
<span class='line-number'>4</span>
<span class='line-number'>5</span>
<span class='line-number'>6</span>
<span class='line-number'>7</span>
<span class='line-number'>8</span>
<span class='line-number'>9</span>
<span class='line-number'>10</span>
<span class='line-number'>11</span>
<span class='line-number'>12</span>
<span class='line-number'>13</span>
<span class='line-number'>14</span>
<span class='line-number'>15</span>
<span class='line-number'>16</span>
<span class='line-number'>17</span>
</pre></td><td class='code'><pre><code class='Bash'><span class='line'><span class="nv">$ </span>rails generate controller client index
</span><span class='line'>      create  app/controllers/client_controller.rb
</span><span class='line'>       route  get <span class="s2">&quot;client/index&quot;</span>
</span><span class='line'>      invoke  erb
</span><span class='line'>      create    app/views/client
</span><span class='line'>      create    app/views/client/index.html.erb
</span><span class='line'>      invoke  test_unit
</span><span class='line'>      create    <span class="nb">test</span>/functional/client_controller_test.rb
</span><span class='line'>      invoke  helper
</span><span class='line'>      create    app/helpers/client_helper.rb
</span><span class='line'>      invoke    test_unit
</span><span class='line'>      create      <span class="nb">test</span>/unit/helpers/client_helper_test.rb
</span><span class='line'>      invoke  assets
</span><span class='line'>      invoke    coffee
</span><span class='line'>      create      app/assets/javascripts/client.js.coffee
</span><span class='line'>      invoke    scss
</span><span class='line'>      create      app/assets/stylesheets/client.css.scss
</span></code></pre></td></tr></table></div></figure>


<p>Then add <b>root :to => &#8216;client#index&#8217;</b> to <b>config/routes.rb</b> so that your new view is displayed in the root url.</p>


<p></p></p>

<p>Run <b>rails server</b> or whatever you do to start your dev instance and browse to it. You should get the usual &#8220;find me in app/views/client/index.html.erb&#8221; message. Check the headers to make sure the library is being installed. The rest of the examples then deal with <b>app/views/client/index.html.erb</b> and <b>app/helpers/client_helper.rb</b>.</p>


<p></p></p>

<p>For the <a href="http://www.twilio.com/docs/quickstart/client/hello-monkey">first example</a> you want:</p>


<p><br /></p>

<figure class='code'><figcaption><span>Helper</span></figcaption><div class="highlight"><table><tr><td class="gutter"><pre class="line-numbers"><span class='line-number'>1</span>
<span class='line-number'>2</span>
<span class='line-number'>3</span>
<span class='line-number'>4</span>
<span class='line-number'>5</span>
<span class='line-number'>6</span>
<span class='line-number'>7</span>
</pre></td><td class='code'><pre><code class='Ruby'><span class='line'><span class="k">module</span> <span class="nn">ClientHelper</span>
</span><span class='line'>  <span class="k">def</span> <span class="nf">twilio_token</span>
</span><span class='line'>    <span class="n">capability</span> <span class="o">=</span> <span class="no">Twilio</span><span class="o">::</span><span class="no">Util</span><span class="o">::</span><span class="no">Capability</span><span class="o">.</span><span class="n">new</span> <span class="no">TwilioAccountSID</span><span class="p">,</span> <span class="no">TwilioAuthToken</span>
</span><span class='line'>    <span class="n">capability</span><span class="o">.</span><span class="n">allow_client_outgoing</span> <span class="s2">&quot;APabe7650f654fc34655fc81ae71caa3ff&quot;</span>
</span><span class='line'>    <span class="n">capability</span><span class="o">.</span><span class="n">generate</span>
</span><span class='line'>  <span class="k">end</span>
</span><span class='line'><span class="k">end</span>
</span></code></pre></td></tr></table></div></figure>


<figure class='code'><figcaption><span>View</span></figcaption><div class="highlight"><table><tr><td class="gutter"><pre class="line-numbers"><span class='line-number'>1</span>
<span class='line-number'>2</span>
<span class='line-number'>3</span>
<span class='line-number'>4</span>
<span class='line-number'>5</span>
<span class='line-number'>6</span>
<span class='line-number'>7</span>
<span class='line-number'>8</span>
<span class='line-number'>9</span>
<span class='line-number'>10</span>
<span class='line-number'>11</span>
<span class='line-number'>12</span>
<span class='line-number'>13</span>
<span class='line-number'>14</span>
<span class='line-number'>15</span>
<span class='line-number'>16</span>
<span class='line-number'>17</span>
<span class='line-number'>18</span>
<span class='line-number'>19</span>
<span class='line-number'>20</span>
<span class='line-number'>21</span>
<span class='line-number'>22</span>
<span class='line-number'>23</span>
</pre></td><td class='code'><pre><code class='HTML'><span class='line'><span class="err">&lt;</span>%= javascript_tag do %&gt;
</span><span class='line'>function call() {
</span><span class='line'>  Twilio.Device.connect();
</span><span class='line'>}
</span><span class='line'>function hangup() {
</span><span class='line'>  Twilio.Device.disconnectAll();
</span><span class='line'>}
</span><span class='line'>$(function() {
</span><span class='line'>  Twilio.Device.setup(&quot;<span class="err">&lt;</span>%= twilio_token %&gt;&quot;);
</span><span class='line'>Twilio.Device.ready(function (device) {
</span><span class='line'>    $(&quot;#log&quot;).text(&quot;Ready&quot;);
</span><span class='line'>  });
</span><span class='line'>Twilio.Device.error(function (error) {
</span><span class='line'>    $(&quot;#log&quot;).text(&quot;Error: &quot; + error.message);
</span><span class='line'>  });
</span><span class='line'>Twilio.Device.connect(function (conn) {
</span><span class='line'>    $(&quot;#log&quot;).text(&quot;Successfully established call&quot;);
</span><span class='line'>  });
</span><span class='line'>});
</span><span class='line'><span class="err">&lt;</span>% end %&gt;
</span><span class='line'><span class="nt">&lt;button</span> <span class="na">class=</span><span class="s">&quot;call&quot;</span> <span class="na">onclick=</span><span class="s">&quot;call();&quot;</span><span class="nt">&gt;</span>
</span><span class='line'>  Call
</span><span class='line'><span class="nt">&lt;/button&gt;</span>
</span></code></pre></td></tr></table></div></figure>


<p>For the <a href="http://www.twilio.com/docs/quickstart/client/hangup">second example</a>, you just change the view.</p>


<p></p></p>

<figure class='code'><figcaption><span></span></figcaption><div class="highlight"><table><tr><td class="gutter"><pre class="line-numbers"><span class='line-number'>1</span>
<span class='line-number'>2</span>
<span class='line-number'>3</span>
<span class='line-number'>4</span>
<span class='line-number'>5</span>
<span class='line-number'>6</span>
<span class='line-number'>7</span>
<span class='line-number'>8</span>
<span class='line-number'>9</span>
<span class='line-number'>10</span>
<span class='line-number'>11</span>
<span class='line-number'>12</span>
<span class='line-number'>13</span>
<span class='line-number'>14</span>
<span class='line-number'>15</span>
<span class='line-number'>16</span>
<span class='line-number'>17</span>
<span class='line-number'>18</span>
<span class='line-number'>19</span>
<span class='line-number'>20</span>
<span class='line-number'>21</span>
<span class='line-number'>22</span>
<span class='line-number'>23</span>
<span class='line-number'>24</span>
<span class='line-number'>25</span>
<span class='line-number'>26</span>
<span class='line-number'>27</span>
<span class='line-number'>28</span>
<span class='line-number'>29</span>
<span class='line-number'>30</span>
</pre></td><td class='code'><pre><code class='HTML'><span class='line'><span class="err">&lt;</span>%= javascript_tag do %&gt;
</span><span class='line'>function call() {
</span><span class='line'>  Twilio.Device.connect();
</span><span class='line'>}
</span><span class='line'>function hangup() {
</span><span class='line'>  Twilio.Device.disconnectAll();
</span><span class='line'>}
</span><span class='line'>$(function() {
</span><span class='line'>  Twilio.Device.setup(&quot;<span class="err">&lt;</span>%= twilio_token %&gt;&quot;);
</span><span class='line'>Twilio.Device.ready(function (device) {
</span><span class='line'>    $(&quot;#log&quot;).text(&quot;Ready&quot;);
</span><span class='line'>  });
</span><span class='line'>Twilio.Device.error(function (error) {
</span><span class='line'>    $(&quot;#log&quot;).text(&quot;Error: &quot; + error.message);
</span><span class='line'>  });
</span><span class='line'>Twilio.Device.disconnect(function (conn) {
</span><span class='line'>    $(&quot;#log&quot;).text(&quot;Call ended&quot;);
</span><span class='line'>  });
</span><span class='line'>Twilio.Device.connect(function (conn) {
</span><span class='line'>    $(&quot;#log&quot;).text(&quot;Successfully established call&quot;);
</span><span class='line'>  });
</span><span class='line'>});
</span><span class='line'><span class="err">&lt;</span>% end %&gt;
</span><span class='line'><span class="nt">&lt;button</span> <span class="na">class=</span><span class="s">&quot;call&quot;</span> <span class="na">onclick=</span><span class="s">&quot;call();&quot;</span><span class="nt">&gt;</span>
</span><span class='line'>  Call
</span><span class='line'><span class="nt">&lt;/button&gt;</span>
</span><span class='line'><span class="nt">&lt;button</span> <span class="na">class=</span><span class="s">&quot;hangup&quot;</span> <span class="na">onclick=</span><span class="s">&quot;hangup();&quot;</span><span class="nt">&gt;</span>
</span><span class='line'>  Hangup
</span><span class='line'><span class="nt">&lt;/button&gt;</span>
</span><span class='line'><span class="nt">&lt;div</span> <span class="na">id=</span><span class="s">&quot;log&quot;</span><span class="nt">&gt;</span>Loading pigeons...<span class="nt">&lt;/div&gt;</span>
</span></code></pre></td></tr></table></div></figure>


<p>For the <a href="http://www.twilio.com/docs/quickstart/client/incoming-calls">third example</a> we&#8217;ll have to change the helper and the view accordingly:</p>


<p></p></p>

<p><b>app/helpers/client_helper.rb</b> (note I&#8217;m using my own sandbox id. You get your own inside the Twilio account page!)</p>


<p></p></p>

<figure class='code'><figcaption><span></span></figcaption><div class="highlight"><table><tr><td class="gutter"><pre class="line-numbers"><span class='line-number'>1</span>
<span class='line-number'>2</span>
<span class='line-number'>3</span>
<span class='line-number'>4</span>
<span class='line-number'>5</span>
<span class='line-number'>6</span>
<span class='line-number'>7</span>
<span class='line-number'>8</span>
</pre></td><td class='code'><pre><code class='Ruby'><span class='line'><span class="k">module</span> <span class="nn">ClientHelper</span>
</span><span class='line'>  <span class="k">def</span> <span class="nf">twilio_token</span>
</span><span class='line'>    <span class="n">capability</span> <span class="o">=</span> <span class="no">Twilio</span><span class="o">::</span><span class="no">Util</span><span class="o">::</span><span class="no">Capability</span><span class="o">.</span><span class="n">new</span> <span class="no">TwilioAccountSID</span><span class="p">,</span> <span class="no">TwilioAuthToken</span>
</span><span class='line'>    <span class="n">capability</span><span class="o">.</span><span class="n">allow_client_outgoing</span> <span class="s2">&quot;AP...&quot;</span>
</span><span class='line'>    <span class="n">capability</span><span class="o">.</span><span class="n">allow_client_incoming</span> <span class="s1">&#39;jenny&#39;</span>
</span><span class='line'>    <span class="n">capability</span><span class="o">.</span><span class="n">generate</span>
</span><span class='line'>  <span class="k">end</span>
</span><span class='line'><span class="k">end</span>
</span></code></pre></td></tr></table></div></figure>


<figure class='code'><figcaption><span>app/views/client/index.html.erb</span></figcaption><div class="highlight"><table><tr><td class="gutter"><pre class="line-numbers"><span class='line-number'>1</span>
<span class='line-number'>2</span>
<span class='line-number'>3</span>
<span class='line-number'>4</span>
<span class='line-number'>5</span>
<span class='line-number'>6</span>
<span class='line-number'>7</span>
<span class='line-number'>8</span>
<span class='line-number'>9</span>
<span class='line-number'>10</span>
<span class='line-number'>11</span>
<span class='line-number'>12</span>
<span class='line-number'>13</span>
<span class='line-number'>14</span>
<span class='line-number'>15</span>
<span class='line-number'>16</span>
<span class='line-number'>17</span>
<span class='line-number'>18</span>
<span class='line-number'>19</span>
<span class='line-number'>20</span>
<span class='line-number'>21</span>
<span class='line-number'>22</span>
<span class='line-number'>23</span>
<span class='line-number'>24</span>
<span class='line-number'>25</span>
<span class='line-number'>26</span>
<span class='line-number'>27</span>
<span class='line-number'>28</span>
<span class='line-number'>29</span>
<span class='line-number'>30</span>
<span class='line-number'>31</span>
<span class='line-number'>32</span>
<span class='line-number'>33</span>
<span class='line-number'>34</span>
<span class='line-number'>35</span>
</pre></td><td class='code'><pre><code class='HTML'><span class='line'><span class="err">&lt;</span>%= javascript_tag do %&gt;
</span><span class='line'>function call() {
</span><span class='line'>  Twilio.Device.connect();
</span><span class='line'>}
</span><span class='line'>function hangup() {
</span><span class='line'>  Twilio.Device.disconnectAll();
</span><span class='line'>}
</span><span class='line'>$(function() {
</span><span class='line'>  Twilio.Device.setup(&quot;<span class="err">&lt;</span>%= twilio_token %&gt;&quot;);
</span><span class='line'>Twilio.Device.ready(function (device) {
</span><span class='line'>    $(&quot;#log&quot;).text(&quot;Ready&quot;);
</span><span class='line'>  });
</span><span class='line'>Twilio.Device.error(function (error) {
</span><span class='line'>    $(&quot;#log&quot;).text(&quot;Error: &quot; + error.message);
</span><span class='line'>  });
</span><span class='line'>Twilio.Device.disconnect(function (conn) {
</span><span class='line'>    $(&quot;#log&quot;).text(&quot;Call ended&quot;);
</span><span class='line'>  });
</span><span class='line'>Twilio.Device.connect(function (conn) {
</span><span class='line'>    $(&quot;#log&quot;).text(&quot;Successfully established call&quot;);
</span><span class='line'>  });
</span><span class='line'>Twilio.Device.incoming(function (conn) {
</span><span class='line'>    $(&quot;#log&quot;).text(&quot;Incoming connection from &quot; + conn.parameters.From);
</span><span class='line'>    // accept the incoming connection and start two-way audio
</span><span class='line'>    conn.accept();
</span><span class='line'>  });
</span><span class='line'>});
</span><span class='line'><span class="err">&lt;</span>% end %&gt;
</span><span class='line'><span class="nt">&lt;button</span> <span class="na">class=</span><span class="s">&quot;call&quot;</span> <span class="na">onclick=</span><span class="s">&quot;call();&quot;</span><span class="nt">&gt;</span>
</span><span class='line'>  Call
</span><span class='line'><span class="nt">&lt;/button&gt;</span>
</span><span class='line'><span class="nt">&lt;button</span> <span class="na">class=</span><span class="s">&quot;hangup&quot;</span> <span class="na">onclick=</span><span class="s">&quot;hangup();&quot;</span><span class="nt">&gt;</span>
</span><span class='line'>  Hangup
</span><span class='line'><span class="nt">&lt;/button&gt;</span>
</span><span class='line'><span class="nt">&lt;div</span> <span class="na">id=</span><span class="s">&quot;log&quot;</span><span class="nt">&gt;</span>Loading pigeons...<span class="nt">&lt;/div&gt;</span>
</span></code></pre></td></tr></table></div></figure>


<p>Now, hook up a new action in the client controller to redirect the call from Twilio to the app inside <b>app/controllers/client_controller.rb</b></p>


<p></p></p>

<figure class='code'><figcaption><span></span></figcaption><div class="highlight"><table><tr><td class="gutter"><pre class="line-numbers"><span class='line-number'>1</span>
<span class='line-number'>2</span>
<span class='line-number'>3</span>
<span class='line-number'>4</span>
<span class='line-number'>5</span>
<span class='line-number'>6</span>
<span class='line-number'>7</span>
<span class='line-number'>8</span>
</pre></td><td class='code'><pre><code class='Ruby'><span class='line'><span class="k">def</span> <span class="nf">incoming</span>
</span><span class='line'>  <span class="n">response</span> <span class="o">=</span> <span class="no">Twilio</span><span class="o">::</span><span class="no">TwiML</span><span class="o">::</span><span class="no">Response</span><span class="o">.</span><span class="n">new</span> <span class="k">do</span> <span class="o">|</span><span class="n">r</span><span class="o">|</span>
</span><span class='line'>    <span class="n">r</span><span class="o">.</span><span class="n">Dial</span>  <span class="k">do</span> <span class="o">|</span><span class="n">d</span><span class="o">|</span>
</span><span class='line'>      <span class="n">d</span><span class="o">.</span><span class="n">Client</span> <span class="s1">&#39;jenny&#39;</span>
</span><span class='line'>    <span class="k">end</span>
</span><span class='line'>  <span class="k">end</span>
</span><span class='line'>  <span class="n">render</span> <span class="ss">:text</span> <span class="o">=&gt;</span> <span class="n">response</span><span class="o">.</span><span class="n">text</span>
</span><span class='line'><span class="k">end</span>
</span></code></pre></td></tr></table></div></figure>


<p>Don&#8217;t forget to add <b>post &#8220;client/incoming&#8221;</b> to <b>config/routes.rb</b>. Then point your sandbox URL to your dev box, such as http://yourhome.com:3000/client/incoming.xml.</p>


<p></p></p>

<p>As a bonus, here&#8217;s a rake task to log in to a remote host and set up an ssh tunnel on remote port 3000 to local port 3000:</p>


<p></p></p>

<figure class='code'><figcaption><span>Rakefile</span></figcaption><div class="highlight"><table><tr><td class="gutter"><pre class="line-numbers"><span class='line-number'>1</span>
<span class='line-number'>2</span>
<span class='line-number'>3</span>
<span class='line-number'>4</span>
<span class='line-number'>5</span>
<span class='line-number'>6</span>
<span class='line-number'>7</span>
<span class='line-number'>8</span>
<span class='line-number'>9</span>
<span class='line-number'>10</span>
<span class='line-number'>11</span>
<span class='line-number'>12</span>
<span class='line-number'>13</span>
</pre></td><td class='code'><pre><code class='Ruby'><span class='line'><span class="n">namespace</span> <span class="ss">:tunnel</span> <span class="k">do</span>
</span><span class='line'>  <span class="n">desc</span> <span class="s2">&quot;Start a ssh tunnel&quot;</span>
</span><span class='line'>  <span class="n">task</span> <span class="ss">:start</span> <span class="o">=&gt;</span> <span class="ss">:environment</span> <span class="k">do</span>
</span><span class='line'>    <span class="n">public_host_username</span> <span class="o">=</span> <span class="s2">&quot;sean&quot;</span>
</span><span class='line'>    <span class="n">public_host</span> <span class="o">=</span> <span class="s2">&quot;home.ertw.com&quot;</span>
</span><span class='line'>    <span class="n">public_port</span> <span class="o">=</span> <span class="mi">3000</span>
</span><span class='line'>    <span class="n">local_port</span> <span class="o">=</span> <span class="mi">3000</span>
</span><span class='line'>    <span class="nb">puts</span> <span class="s2">&quot;Starting tunnel </span><span class="si">#{</span><span class="n">public_host</span><span class="si">}</span><span class="s2">:</span><span class="si">#{</span><span class="n">public_port</span><span class="si">}</span><span class="s2"> \</span>
</span><span class='line'><span class="s2">          to 127.0.0.1:</span><span class="si">#{</span><span class="n">local_port</span><span class="si">}</span><span class="s2">&quot;</span>
</span><span class='line'>    <span class="nb">exec</span> <span class="s2">&quot;ssh -nNT -g -R *:</span><span class="si">#{</span><span class="n">public_port</span><span class="si">}</span><span class="s2">:127.0.0.1:</span><span class="si">#{</span><span class="n">local_port</span><span class="si">}</span><span class="s2"> \</span>
</span><span class='line'><span class="s2">                           </span><span class="si">#{</span><span class="n">public_host_username</span><span class="si">}</span><span class="s2">@</span><span class="si">#{</span><span class="n">public_host</span><span class="si">}</span><span class="s2">&quot;</span>
</span><span class='line'>  <span class="k">end</span>
</span><span class='line'><span class="k">end</span>
</span></code></pre></td></tr></table></div></figure>


<p>There are two more examples in the quickstart, but as they are more of the same, I&#8217;ll leave them for another post. I&#8217;d also like to try rewriting the Javascript in Coffeescript.</p>


<p></p></p>

<p>Update - Code is at https://github.com/swalberg/twilio-client-ruby</p>


<p></p></p>
]]></content>
  </entry>
  
</feed>